
Quilt Rack wood plans
Quilt Rack Woodworking Plans
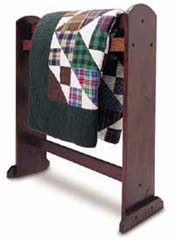
This project can be completed in about an afternoon. The lumber choices include pine, poplar and oak, depending on how much you want to spend on material. The rack may be painted, stained or have a natural finish.
Tools:
Circular saw
Tape measure
Philips screwdriver
Combination square
Power miter saw or miter box
Drill/driver
Paintbrush
Jig saw or Band saw (optional, depending on style chosen)
Materials:
Lumber of your choice sufficient for the pieces
listed in the quilt rack dimensions
Wood screws: 8 flat-head wood screws #6 x 1 1/2";
4 flathead wood screws #6 x1"
3/8" wooden pegs
Assorted grit sandpaper
Finishing materials
Quilt Rack Dimensions
These dimensions may be altered slightly, but keep in mind that drastic alterations may not work. For example, a quilt rack that is too tall may be top-heavy and likely to topple over.

The quilt rack is made up of eight simple components.
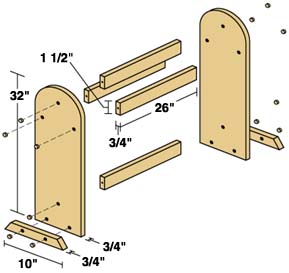
2 stiles 1" x 8" x 32" each. (The main vertical uprights that frame the piece.)
4 horizontal cross members 1" x 2" x 26" each. (3 at the top as hangers for the quilt and one at the bottom as a brace. The inside measurement from stile to stile is 26")
2 horizontal feet 1" x 2" x 10" each. (These are secured to the bottom of the stiles and help stabilize the rack.)
Shaping
Now that the eight pieces are sized, it's time to put the final touches on four of them before assembly.
Let's start with the feet. Using your power miter saw or miter box, trim the ends of each 1" x 2" x 10" piece at a 45 degree angle. The angles slant toward each other at the top of each foot.
Choose the particular cut you want for the top of the stiles. You can use a rounded-top cut, which will require a band saw, jigsaw or scroll saw, or select a simple dog-eared cut. For a rounded-top stile, mark the piece for the round cut by locating and marking the width center. Make another mark the same distance from the top. Use a compass to scribe the curve from the marked center point.
For a dog-eared look, determine the center of the top edge of one of the 1" x 8" x 32" stiles. From that center point, measure 1 1/2" out on each side. You now have the middle 3" of the top edge of the stile. From each side of that 3" mark, use a combination square and pencil to mark a 45 degree angle to the long, vertical side of the stile. After you mark and cut one stile, you may use it as a pattern for the second. Place the ends of the pieces against a stationary, vertical surface in order to ensure two equal pieces when cut.
Drilling and Assembling
Drill holes as indicated in the drawing.
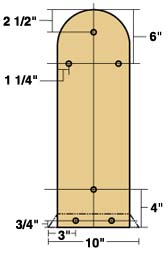
First, use a square and pencil to transfer the center mark at the top of the stiles down about 7" on the outside face parallel with the long edges. Determine the side to face out by choosing the most favorable wood grain.
Make a mark perpendicular to the first mark 6" from the top all the way across the stile to form an upside-down "T." Make certain that the respective marks are parallel to the top and sides of the stile since the "T" will determine where you will drill the holes for the recessed screws.
Measure and mark the spot for each hole, as described below, making a small pencil mark across the respective lines of the "T." The three spots where the lines intersect will mark the centers of your holes.
The first hole, which will hold the screw for the top cross member, will be 2 1/2" from the top of the stile, centered on the 7" pencil mark.
The other two holes will be located 1 1/4" from each outside edge of the stiles, intersecting the pencil mark running across the piece.
For the bottom cross member, which serves primarily as a brace, determine the center point of the stile at the bottom and use a light pencil mark to transfer that point 5" up. Then measure 4" from the bottom, making a small pencil mark across the previous 5" mark. That will be the spot for your bottom brace.
Exploded view of the quilt rack.
Once you have marked one of the stiles, lay it down on a flat, smooth surface. The marks you just made are for countersink holes for the screws that will hold the piece together, so they need to be just 1/4" deep.
Now that the countersink holes are drilled, drill pilot holes for the screws. Use a 1/16" twist bit to drill through the center of the countersink holes and all the way through the stiles.
After drilling the pilot holes in the stiles, do the same in both ends of each 26" cross member: Determine the center of each end by marking diagonal lines from corner to corner. The intersection of the lines will be the center point. Now drill pilot holes approximately 1/4" deep, using the same 1/16" twist bit used on the stiles.
Assembly
Assembled view of the quilt rack.
Start with the top cross member. Place a screw in the top recessed hole of one of the stiles and, using a Phillips screwdriver, turn the screw into the pilot hole until the tip begins to emerge on the other side. Now place one of the cross members against the screw tip, align the pilot hole, and turn the screw into the wood. Repeat for the other stile. Continue until you have put all of the cross members, including the bottom brace, in place. Be sure not to overtighten, so that you can adjust the cross members if needed.
After installing the cross members, measure 3" from each end of both "feet." Then measure up from those points about 3/4" (approximately to the center) of the feet. If everything fits together properly and is correctly adjusted, tighten all screws.
Finishing Hints
WoodWorks.Finish your quilt rack with your favorite finish— oil, lacquer or polyurethane. The new water-based polyurethanes are environmentally friendly, but do require a different finishing technique. Before applying the finish, rub down with a damp cloth. Allow the wood to dry and then sand to remove the raised grain. Repeat this process several times to reduce the tendency of the water-based finish to raise the grain. (The same technique should also be used before applying water-based stains.)
Tools, products, materials, techniques, building codes and local regulations change; therefore, Lowe's assumes no liability for omissions, errors or the outcome of any project. The reader must always exercise reasonable caution, follow applicable codes and regulations, and is urged to consult with a professional if in doubt about any procedures.
Tools:
Circular saw
Tape measure
Philips screwdriver
Combination square
Power miter saw or miter box
Drill/driver
Paintbrush
Jig saw or Band saw (optional, depending on style chosen)
Materials:
Lumber of your choice sufficient for the pieces
listed in the quilt rack dimensions
Wood screws: 8 flat-head wood screws #6 x 1 1/2";
4 flathead wood screws #6 x1"
3/8" wooden pegs
Assorted grit sandpaper
Finishing materials
Quilt Rack Dimensions
These dimensions may be altered slightly, but keep in mind that drastic alterations may not work. For example, a quilt rack that is too tall may be top-heavy and likely to topple over.
The quilt rack is made up of eight simple components.
2 stiles 1" x 8" x 32" each. (The main vertical uprights that frame the piece.)
4 horizontal cross members 1" x 2" x 26" each. (3 at the top as hangers for the quilt and one at the bottom as a brace. The inside measurement from stile to stile is 26")
2 horizontal feet 1" x 2" x 10" each. (These are secured to the bottom of the stiles and help stabilize the rack.)
Shaping
Now that the eight pieces are sized, it's time to put the final touches on four of them before assembly.
Let's start with the feet. Using your power miter saw or miter box, trim the ends of each 1" x 2" x 10" piece at a 45 degree angle. The angles slant toward each other at the top of each foot.
Choose the particular cut you want for the top of the stiles. You can use a rounded-top cut, which will require a band saw, jigsaw or scroll saw, or select a simple dog-eared cut. For a rounded-top stile, mark the piece for the round cut by locating and marking the width center. Make another mark the same distance from the top. Use a compass to scribe the curve from the marked center point.
For a dog-eared look, determine the center of the top edge of one of the 1" x 8" x 32" stiles. From that center point, measure 1 1/2" out on each side. You now have the middle 3" of the top edge of the stile. From each side of that 3" mark, use a combination square and pencil to mark a 45 degree angle to the long, vertical side of the stile. After you mark and cut one stile, you may use it as a pattern for the second. Place the ends of the pieces against a stationary, vertical surface in order to ensure two equal pieces when cut.
Drilling and Assembling
Drill holes as indicated in the drawing.
First, use a square and pencil to transfer the center mark at the top of the stiles down about 7" on the outside face parallel with the long edges. Determine the side to face out by choosing the most favorable wood grain.
Make a mark perpendicular to the first mark 6" from the top all the way across the stile to form an upside-down "T." Make certain that the respective marks are parallel to the top and sides of the stile since the "T" will determine where you will drill the holes for the recessed screws.
Measure and mark the spot for each hole, as described below, making a small pencil mark across the respective lines of the "T." The three spots where the lines intersect will mark the centers of your holes.
The first hole, which will hold the screw for the top cross member, will be 2 1/2" from the top of the stile, centered on the 7" pencil mark.
The other two holes will be located 1 1/4" from each outside edge of the stiles, intersecting the pencil mark running across the piece.
For the bottom cross member, which serves primarily as a brace, determine the center point of the stile at the bottom and use a light pencil mark to transfer that point 5" up. Then measure 4" from the bottom, making a small pencil mark across the previous 5" mark. That will be the spot for your bottom brace.
Exploded view of the quilt rack.
Once you have marked one of the stiles, lay it down on a flat, smooth surface. The marks you just made are for countersink holes for the screws that will hold the piece together, so they need to be just 1/4" deep.
Now that the countersink holes are drilled, drill pilot holes for the screws. Use a 1/16" twist bit to drill through the center of the countersink holes and all the way through the stiles.
After drilling the pilot holes in the stiles, do the same in both ends of each 26" cross member: Determine the center of each end by marking diagonal lines from corner to corner. The intersection of the lines will be the center point. Now drill pilot holes approximately 1/4" deep, using the same 1/16" twist bit used on the stiles.
Assembly
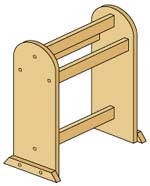
Assembled view of the quilt rack.
Start with the top cross member. Place a screw in the top recessed hole of one of the stiles and, using a Phillips screwdriver, turn the screw into the pilot hole until the tip begins to emerge on the other side. Now place one of the cross members against the screw tip, align the pilot hole, and turn the screw into the wood. Repeat for the other stile. Continue until you have put all of the cross members, including the bottom brace, in place. Be sure not to overtighten, so that you can adjust the cross members if needed.
After installing the cross members, measure 3" from each end of both "feet." Then measure up from those points about 3/4" (approximately to the center) of the feet. If everything fits together properly and is correctly adjusted, tighten all screws.
Finishing Hints
WoodWorks.Finish your quilt rack with your favorite finish— oil, lacquer or polyurethane. The new water-based polyurethanes are environmentally friendly, but do require a different finishing technique. Before applying the finish, rub down with a damp cloth. Allow the wood to dry and then sand to remove the raised grain. Repeat this process several times to reduce the tendency of the water-based finish to raise the grain. (The same technique should also be used before applying water-based stains.)
Tools, products, materials, techniques, building codes and local regulations change; therefore, Lowe's assumes no liability for omissions, errors or the outcome of any project. The reader must always exercise reasonable caution, follow applicable codes and regulations, and is urged to consult with a professional if in doubt about any procedures.
