Harvest Clock Woodworking Plans
Materials:
Western red cedar - 1.2m of 40mm x 12mm
Sheet of ply - 900mm x 600mm x 4mm
Cedar cover strip - 300mm of 40 x 8mm
Medium-grade sandpaper
Half-inch panel pins
Blank paper
All-purpose clear adhesive
Seeds, pasta, corn etc.
Battery-operated clock mechanism and hands
Two 25mm, 1-inch cup hooks
Picture wire
Carbon paper
TOOLS
Mitre hand saw or hand saw with mitre box
Staple gun and 10mm staples
Hammer
Small paint brush
Scissors
Pencil and ruler
Drill and drill bit
Craft knife
Glue
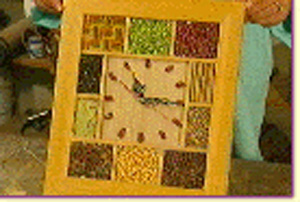
The basic idea is to attach a battery-operated clock mechanism to a framed plywood background and then decorate it.
You could simply buy a wooden frame from the shop for the clock's border, but we've decided to make that ourselves, using cedar. Once that's made we will attach a piece of plywood for the backing. The mechanism will then be attached to this backing as will the pasta and seeds that make up the design.
You can adapt the clock's 'look' to your own imagination, for example, if you want to place it in a child's room you could use bright colours and lollies on the clock face.
1 The first step is to make the cedar frame. Cut the sides of the frame to 300mm (top and bottom lengths) and 250mm (side lengths) using the mitre saw. Glue the ends of the frame sides and staple them together. Make sure you staple the back of the frame, not the front.
2 Cut the ply so that it is 10mm smaller than the frame (290mm x 240mm), then glue or nail it to the back of the frame, making sure there is a 5mm gap around the edge of the frame.
3 Next, cut the cedar cover strip using a Stanley knife into five strips (300mm x 8mm x 8mm). With these strips make a simple frame to fit inside the cedar frame, making sure you leave enough room for the hands to move around.
4 Glue the fifth cedar cover strip to the background, according to your design and fill the sections with seeds and pasta. Don't forget to add hour marks to the clock face.
5 Insert the clock mechanism through the plywood.
6 Finally, to hang the clock, screw the cup hooks into the back of the frame and attach the picture wire to them.