
Entryway Bench wood plans
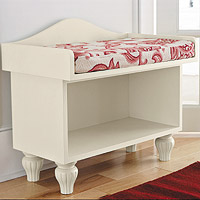
Entryway Bench Woodworking Plans
Skill level: Beginning woodworker
Time to complete: 1-2 weekends, including painting
Estimated cost: $200-$300 for one bench, one shelf, and table
Materials
49x97-inch sheet of 3/4-inch medium-density fiberboard (MDF)
Wood glue
One package 6d finishing nails
Six No. 6x1-1/4-inch drywall screws
Six No. 8x2-inch drywall screws
Four wood bun feet*
Two wood legs*
Two lengths wood molding*
Wood filler
1 quart latex primer and semigloss enamel paint
Three coat hooks for wall shelf
Items #02007081 (fluted tulip bun foot)
#02005568 (fluted dining table leg)
#0200092 (Hardwood scroll)
Van Dyke's Restorers www.vandykes.com
Tools
Tape rule
Pencil
Angle square or combination square
C-clamps
Table saw (with standard and dado blades)
Jigsaw
Sanding block with 100-grit sandpaper
Drill
Drill bits (1/16, 3/16 with countersink)
No. 2 Phillips screwdriver (or driver bit for drill)
Hammer
Nail set
Putty knife
Paintbrushes
Stud finder
Builder's level
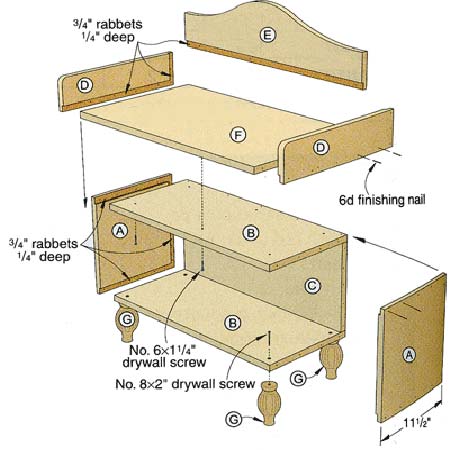
Use the table saw to cut the individual parts (A-F) from MDF. Next, fit the table saw with a 3/4-inch dado blade (or use a router with a 3/4-inch straight bit) to cut the rabbets on parts A, D, and E as shown. These joints create stronger corners and make assembly easier; cut them on the upper, lower, and rear edges of the box ends (A), the lower and rear edges of the seat end rails (D), and the lower edge of the seat crest rail (E); make sure rabbets are on the inside face of the pieces.
Next, use a pencil to trace the desired curve on the seat crest rail (E); the exact contour isn't critical, but keep it symmetrical and make sure the ends taper to 4 inches wide to align with the seat end rails (D). Use the jigsaw to cut along the line and also to cut a small radius on the upper front corners of the end rails as shown; sand curves smooth.
Assembly
1. Start by assembling the box portion of the bench. First, drill 1/16-inch holes (for nailing) along the rabbets and other areas that will abut the edge of an adjoining piece. Secure the rabbeted lower edges of the box ends (A) to the edges of the bottom panel (B) with glue and 6d finishing nails, making sure front edges are flush at the corners; repeat to attach the top panel (B). Next, use glue and nails to attach the box back panel as shown.
2. Use the same glue-and-nails technique to assemble the seat ends (D) and crest rail (E) to the seat panel (F) as shown. Then drill six 3/16-inch holes through the box top panel (one hole at each corner, and two near the center); fit the seat assembly atop the bench box, adjust for a 2-1/2-inch front overhang and 3/4-inch overhang on each end, then drive 1-1/4-inch drywall screws up through the box panel to secure the seat.
3. Lay the bench on its back and drill a 3/16-inch hole 2 inches in from each corner in the bottom panel; use the 2-inch drywall screws to attach the bun feet (G). Set the bench upright, use a nail set to countersink the finishing nails, and fill holes with wood filler. Use the sanding block to ease sharp edges and corners, then set the bench aside for painting.
Time to complete: 1-2 weekends, including painting
Estimated cost: $200-$300 for one bench, one shelf, and table
Parts |
[A] Ends |
[B] Top/Bottom |
[C] Rear |
[D] End Rails |
[E] Crest Rail |
[F] Seat Panel |
Thickness |
3/4 |
3/4 |
3/4 |
3/4 |
3/4 |
3/4 |
Width |
11-1/2 |
11-1/2 |
10 |
4 |
7 |
15-1/2 |
Length |
12-1/4 |
25 |
25 |
15 |
26-1/2 |
26-1/2 |
Quantity |
2 |
2 |
1 |
2 |
1 |
1 |
Note: All dimensions are in inches. See materials list for bun feet specifications |
||||||
Materials
49x97-inch sheet of 3/4-inch medium-density fiberboard (MDF)
Wood glue
One package 6d finishing nails
Six No. 6x1-1/4-inch drywall screws
Six No. 8x2-inch drywall screws
Four wood bun feet*
Two wood legs*
Two lengths wood molding*
Wood filler
1 quart latex primer and semigloss enamel paint
Three coat hooks for wall shelf
Items #02007081 (fluted tulip bun foot)
#02005568 (fluted dining table leg)
#0200092 (Hardwood scroll)
Van Dyke's Restorers www.vandykes.com
Tools
Tape rule
Pencil
Angle square or combination square
C-clamps
Table saw (with standard and dado blades)
Jigsaw
Sanding block with 100-grit sandpaper
Drill
Drill bits (1/16, 3/16 with countersink)
No. 2 Phillips screwdriver (or driver bit for drill)
Hammer
Nail set
Putty knife
Paintbrushes
Stud finder
Builder's level
Use the table saw to cut the individual parts (A-F) from MDF. Next, fit the table saw with a 3/4-inch dado blade (or use a router with a 3/4-inch straight bit) to cut the rabbets on parts A, D, and E as shown. These joints create stronger corners and make assembly easier; cut them on the upper, lower, and rear edges of the box ends (A), the lower and rear edges of the seat end rails (D), and the lower edge of the seat crest rail (E); make sure rabbets are on the inside face of the pieces.
Next, use a pencil to trace the desired curve on the seat crest rail (E); the exact contour isn't critical, but keep it symmetrical and make sure the ends taper to 4 inches wide to align with the seat end rails (D). Use the jigsaw to cut along the line and also to cut a small radius on the upper front corners of the end rails as shown; sand curves smooth.
Assembly
1. Start by assembling the box portion of the bench. First, drill 1/16-inch holes (for nailing) along the rabbets and other areas that will abut the edge of an adjoining piece. Secure the rabbeted lower edges of the box ends (A) to the edges of the bottom panel (B) with glue and 6d finishing nails, making sure front edges are flush at the corners; repeat to attach the top panel (B). Next, use glue and nails to attach the box back panel as shown.
2. Use the same glue-and-nails technique to assemble the seat ends (D) and crest rail (E) to the seat panel (F) as shown. Then drill six 3/16-inch holes through the box top panel (one hole at each corner, and two near the center); fit the seat assembly atop the bench box, adjust for a 2-1/2-inch front overhang and 3/4-inch overhang on each end, then drive 1-1/4-inch drywall screws up through the box panel to secure the seat.
3. Lay the bench on its back and drill a 3/16-inch hole 2 inches in from each corner in the bottom panel; use the 2-inch drywall screws to attach the bun feet (G). Set the bench upright, use a nail set to countersink the finishing nails, and fill holes with wood filler. Use the sanding block to ease sharp edges and corners, then set the bench aside for painting.
