
Daisy Bookmark Tatting Pattern

This bookmark is my own design. My first row was the six petal daisies, separated by small rings. I came around the outside edge with rings and chains, filling in the open spaces, finally ending with a split ring tail that blossoms into another daisy. Tatted with #30 Cebelia, about 5" long.
Begin with two shuttles, continuous wound. You will be making a 'daisy chain' first, starting with ring A in the diagram.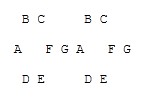 Ring A(split): 6 p 6/ 6 p 6 Ring B(sh 1):6 j 6 p 6 p 6. Ring C(sh 1):6 j(to B) 6 p 6 p 6. Reverse work. Ring D(sh 2):6 j(to A) 6 p 6 p 6. Ring E(sh 2):6 j(to D) 6 p 6 p 5. Ring F(split): 6 j(to C) 6/ 6 j(to E) 6. Leave a space for a mock picot. Ring G(split): 2 p 2 p 2/ 2 p 2 p 2. Leave a space for a mock picot before starting Ring A. Repeat from Ring A, continue making daisies and small centers. I made 5 daisies with small centers between each one. All chains are 3 p 3 p 3 p 3. Begin with a chain after your last Ring F, join to the free picot of the next 'petal' in your daisy. Chain again, join in the next free picot of the next petal in your daisy. Reverse work. Ring of 12 j (to p of adjacent ring G) 12. Reverse work. Chain, reverse work. Ring of 12 j (to next p of same ring G) 12. Reverse work. Join to free picot of next daisy, continue with chains and rings all around the bookmark. The tail is made of split rings, 6/6, and I ended with another daisy when I got tired. You may copy and share this pattern, but please leave my name as it is my original pattern. Lenore English |
|
