
Sock Snowman Sewing Pattern
(Almost) No-Sew Sock Snowmen Pattern
These little guys (or gals) are delightfully quick and easy to make, and give you a use for any old mis-matched socks you may have accumulated. (If you don't have any old mis-matched socks, you can buy bags of tube socks at discount stores, and still make these from them real inexpensively).
For Each Snowman You'll need:
One white sock
Parts of one or two colored socks
A few odd buttons
Various remnant trims of your choice
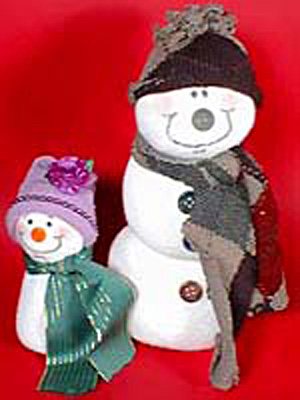
 For the snowpeople shown here, I used a small child size sock with a heel, and a men's size tube sock.
Start by cutting the sock. Socks with heels should be cut before the heel, and tube socks can be cut to whatever length you'd like your snowman's height to be. If you're making a '3 ball body', you'll need a longer section than for a '2 ball body'.
Stuff the bodies, then run a gathering thread around the bottom edge and pull tightly to gather. Knot and cut the thread. (Use white thread - black is shown here so it's easier to see in the picture).
Decide how big you want the head to be, and wrap thread and tie securely to make a nice round head. Do the same in the middle of the body if you're making a '3 ball body' snowman. Be sure the bottom ball is a little larger than the middle one.
Use a colored sock for each hat. You can cut the toe end of the sock off (about 4'' or so), like I did with the small lavender hat, and roll the cut edge to form a brim.
Or, cut a section from the middle of the sock (if you want a particular design area), then make 1'' slices in from one end, about 1/4'' apart or less. This makes a nice pompom. Wrap a thread around the top just below the slices, pull tight to gather, and knot the thread. Roll the bottom edge to form the hat brim.
Position hats on snowmen. Pull them down a bit to keep them in place. You can tack them with fabric glue or even a few hand stitches if you like.
For a scarf, spiral cut a sock, about 2'' wide, and about 12'' long. Start at one end, and on an angle, cut through only one layer of the sock. Continue cutting around the sock, keeping your cut section about 2'' wide. When you run out of sock, cut both ends off squared.
Tie the scarves around your snowmen's necks. Let them hang loosely and a little lopsided. I used a striped ribbon for a scarf on the small snowman.
Add any interesting embellishments you want. On the small snowman, I added a row of bead trim above the hat brim, and a small silk flower to the top. They were glued in place with fabric glue, or they could be stitched in place.
For the noses, I attached a couple of odd buttons. These can be glued or sewn in place. On the larger snowman, I also added a few different buttons down the front of his body. If you're using glue, keep the snowmen lying down while they dry or they have a tendency to slide down the body.
I drew the faces on with a permanent black marker. They can also be painted with an acrylic paint or even with crayons. Copy the face I show here, or make up your own.
Last, I added a little bit of blush to their cheeks. I used real powder blush, but you can also use a pink crayon (very lightly - practice on a scrap first).
For Each Snowman You'll need:
One white sock
Parts of one or two colored socks
A few odd buttons
Various remnant trims of your choice
For the snowpeople shown here, I used a small child size sock with a heel, and a men's size tube sock.Start by cutting the sock. Socks with heels should be cut before the heel, and tube socks can be cut to whatever length you'd like your snowman's height to be. If you're making a '3 ball body', you'll need a longer section than for a '2 ball body'.
Stuff the bodies, then run a gathering thread around the bottom edge and pull tightly to gather. Knot and cut the thread. (Use white thread - black is shown here so it's easier to see in the picture).
Decide how big you want the head to be, and wrap thread and tie securely to make a nice round head. Do the same in the middle of the body if you're making a '3 ball body' snowman. Be sure the bottom ball is a little larger than the middle one.
Use a colored sock for each hat. You can cut the toe end of the sock off (about 4'' or so), like I did with the small lavender hat, and roll the cut edge to form a brim.
Or, cut a section from the middle of the sock (if you want a particular design area), then make 1'' slices in from one end, about 1/4'' apart or less. This makes a nice pompom. Wrap a thread around the top just below the slices, pull tight to gather, and knot the thread. Roll the bottom edge to form the hat brim.
Position hats on snowmen. Pull them down a bit to keep them in place. You can tack them with fabric glue or even a few hand stitches if you like.
For a scarf, spiral cut a sock, about 2'' wide, and about 12'' long. Start at one end, and on an angle, cut through only one layer of the sock. Continue cutting around the sock, keeping your cut section about 2'' wide. When you run out of sock, cut both ends off squared.
Tie the scarves around your snowmen's necks. Let them hang loosely and a little lopsided. I used a striped ribbon for a scarf on the small snowman.
Add any interesting embellishments you want. On the small snowman, I added a row of bead trim above the hat brim, and a small silk flower to the top. They were glued in place with fabric glue, or they could be stitched in place.
For the noses, I attached a couple of odd buttons. These can be glued or sewn in place. On the larger snowman, I also added a few different buttons down the front of his body. If you're using glue, keep the snowmen lying down while they dry or they have a tendency to slide down the body.
I drew the faces on with a permanent black marker. They can also be painted with an acrylic paint or even with crayons. Copy the face I show here, or make up your own.
Last, I added a little bit of blush to their cheeks. I used real powder blush, but you can also use a pink crayon (very lightly - practice on a scrap first).
