
Sock Monkey Sewing Pattern
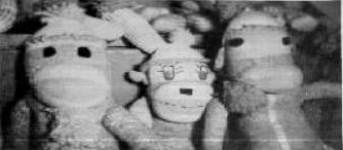
Sock Monkey Sewing Pattern
Materials:
1 pair of men's extra large (size 12-13) socks; preferably Original Rockford red Heel (r) socks.
1 bag of poly-fiberfil stuffing or cotton batting.
1 spool of white thread
red yarn
black embroidery thread
Optional two white buttons for eyes
INSTRUCTIONS:
Sock #1, body and legs:
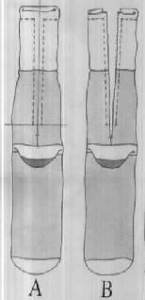
A. Turn sock inside out and create a center line from the white heel to the top of the sock. Mark a line 3" away from the white heel, across the sock. Mark a notch 1 1/2" away from white heel on the center line. This will form the legs.
B. Beginning at the 3" line, stitch a line 1/4" away from the right side of thecenter line and stop 1/4" away from the top edge of sock. Pivot and sew a line across the top of the sock to the outside edge. Repeat on left side. Cut sock open on the center line down to the 1 1/2" notch.
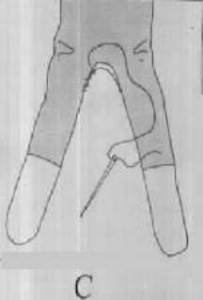
C. Turn sock right-sie out and stuff using opening between legs. When body and legs are completely stuffed, overcast the opening to close hole.
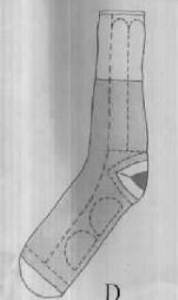
D. Sock #2, mouth, arms, tail, ears, and hat:
1. Hat:
Cut off the white toe of sock making sure to leave 1/2" brown seam allowance to create roll. *DO NOT cut on fold, sock may not be symmetrical.
2. Mouth:
Cut off white and red heel, leaving 1/2" seam allowance to turn under when sewing. * Again, DO NOT cut on the fold.
3. Tail and Arms:
Divide upper section of the sock into three equal sections. To form tail draw a line from the top to the toe on the inside (long side) of the sock. Draw a line across the bottom of the remaining two sections (just above the heel) to form base of arms. Round off top of arms on white part of sock. Cut out each section. Sew each piece using 1/4" seam allowance, turn and stuff.
4. Ears:
Using remaining sock, mark two half circles for ears and cut out. Sew using 1/4" seam allowance, turn and lightly stuff.
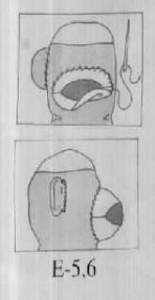
E. Attaching Sections:
5. Mouth:
Place on front of monkey's face about 1" below white edge. Whip stitch top edge of mouth section first to secure, and stuff. Sew around bottom of the mouth to close.
6. Ears:
Place on sides of monkey's head and whip stitch in place. May choose to do a small running stitch 1/8" in from edge of ear to create rim.
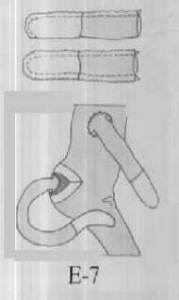
7. Tail and Arms:
Attach tail at the seat of the monkey center in red of heel. Whipstitch closed. Secure arms on either side of monkey's body with whipstitch.
8. Tack hat to top of head.
Finishing:
All finishing techniques are entirely up to the creator. There is no right or wrong. The following suggestions are based on a typical sock monkey style:
F. Sew button eyes on face of monkey, or embroider eyes. May choose to embroider eyelashes.
G. Embroider line across center of red mouth, and embroider nostrils.
H. Add red yarn pom-poms to hands, feet, around neck and on top of hat.
1 pair of men's extra large (size 12-13) socks; preferably Original Rockford red Heel (r) socks.
1 bag of poly-fiberfil stuffing or cotton batting.
1 spool of white thread
red yarn
black embroidery thread
Optional two white buttons for eyes
INSTRUCTIONS:
Sock #1, body and legs:
A. Turn sock inside out and create a center line from the white heel to the top of the sock. Mark a line 3" away from the white heel, across the sock. Mark a notch 1 1/2" away from white heel on the center line. This will form the legs.
B. Beginning at the 3" line, stitch a line 1/4" away from the right side of thecenter line and stop 1/4" away from the top edge of sock. Pivot and sew a line across the top of the sock to the outside edge. Repeat on left side. Cut sock open on the center line down to the 1 1/2" notch.
C. Turn sock right-sie out and stuff using opening between legs. When body and legs are completely stuffed, overcast the opening to close hole.
D. Sock #2, mouth, arms, tail, ears, and hat:
1. Hat:
Cut off the white toe of sock making sure to leave 1/2" brown seam allowance to create roll. *DO NOT cut on fold, sock may not be symmetrical.
2. Mouth:
Cut off white and red heel, leaving 1/2" seam allowance to turn under when sewing. * Again, DO NOT cut on the fold.
3. Tail and Arms:
Divide upper section of the sock into three equal sections. To form tail draw a line from the top to the toe on the inside (long side) of the sock. Draw a line across the bottom of the remaining two sections (just above the heel) to form base of arms. Round off top of arms on white part of sock. Cut out each section. Sew each piece using 1/4" seam allowance, turn and stuff.
4. Ears:
Using remaining sock, mark two half circles for ears and cut out. Sew using 1/4" seam allowance, turn and lightly stuff.
E. Attaching Sections:
5. Mouth:
Place on front of monkey's face about 1" below white edge. Whip stitch top edge of mouth section first to secure, and stuff. Sew around bottom of the mouth to close.
6. Ears:
Place on sides of monkey's head and whip stitch in place. May choose to do a small running stitch 1/8" in from edge of ear to create rim.
7. Tail and Arms:
Attach tail at the seat of the monkey center in red of heel. Whipstitch closed. Secure arms on either side of monkey's body with whipstitch.
8. Tack hat to top of head.
Finishing:
All finishing techniques are entirely up to the creator. There is no right or wrong. The following suggestions are based on a typical sock monkey style:
F. Sew button eyes on face of monkey, or embroider eyes. May choose to embroider eyelashes.
G. Embroider line across center of red mouth, and embroider nostrils.
H. Add red yarn pom-poms to hands, feet, around neck and on top of hat.
