
Rabbit Felt Sewing Pattern
Rabbit Felt Sewing Pattern
Materials:
Rainbow Shaggy Plush Felt™(You may also use Rainbow Plush Felt):
18" x 22 1/2" Brown Sugar craft cut (or color of your choice) for body Creamy White (or color of your choice) for tummy and muzzle
1" x 20" remnant of fabric or ribbon
Poly-pellets by Fairfield
Poly-Fil by Fairfield
1/4" black pom-pom
Two 4mm black round beads
Brown Animal Whiskers by One and Only Creations
19 gauge black wire
Black thread
Powder Blush (optional)
Hot glue gun / glue sticks
Doll needle
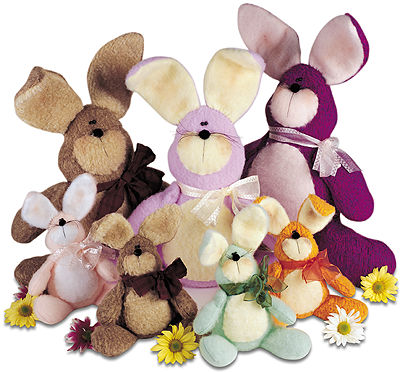
Read all instructions carefully before beginning. Instructions are for smaller rabbit which measures 10" in length from tip of ear to toe. Enlarge PATTERN 200% for larger rabbit which measures 20" in length from tip of ear to toe.
WRST = With Right Sides Together
RSO = Right Sides Out.
Instructions:
Step 1. BODY - Using a double thickness of Brown Sugar Shaggy Plush Felt, trace around pattern on wrong side of one layer of felt. WRST sew along traced lines. Cut out body by cutting 1/4" from stitching. Clip inward corners. Cut a slit between circles through one layer of felt only. Turn RSO through slit. Stuff each leg half full with Poly-fill. Sew along dashed lines between legs and body. Fill bottom with 1/4 cup of Poly-pellets. Stuff remaining body with Poly-Fil. Hand-sew opening closed.
Step 2. ARMS - WRST, use a double thickness of Brown Sugar Shaggy Plush Felt. On wrong side of one piece of felt, trace around pattern. Invert pattern and trace around for other arm. WRST sew along traced lines. Cut out arms 1/4" from stitching. Cut a small slit between circles through one layer of felt only. Turn RSO through slit and stuff arms half full with Poly-fill. Hand-sew openings closed. Thread doll needle with a long piece of double strand thread. Knot ends together leaving a 5" tail. Position arms at sides of body in shoulder area. Insert needle into one arm at upper circle. Push needle through body piercing other arm at upper circle. Pull arms snugly to body. Turn and insert needle again at circle, pushing needle through body to other arm. Repeat 2-3 times. Secure ends of remaining thread and tail together in a double knot. (Optional: Hot glue arms to sides of body.)
Step 3. EARS - WRST, use a double thickness of Shaggy Plush Felt-one of Brown Sugar and one of Creamy White. On wrong side of one piece of felt trace around pattern. Invert pattern and trace around for other ear. WRST sew along traced lines leaving lower edges open. Cut out ears 1/4" from stitching. Turn RSO through opening. Cut two 8" pieces of 19 gauge black wire. Shape to form ears by inserting wire into felt ears. Overlap and secure ends of wire. Whip stitch lower openings closed. Hand-sew ears to head. Apply blush to center of ears (optional). Bend ears as desired.
Step 4. FACE - Cut muzzle from Creamy White Shaggy Plush Felt. Hand-sew (slip stitch) to face, placing a small amount of Poly-Fil under muzzle as you sew. Using two strands of black thread make a long straight stitch down center of muzzle. For eyes hand-sew two 4 mm black beads to face. Hot glue 21/2" strands of Animal Whiskers to face. For nose, hot glue pom-pom over whiskers. Apply blush to cheeks (optional).
Step 5. BELLY - Cut belly from Creamy White Shaggy Plush Felt. Hand-sew (slip stitch) belly to body front.
Step 6. TAIL - To form pom-pom for tail, cut a 2" x 3" piece of Creamy White Shaggy Plush Felt. Along both 3" sides, cut strips of felt every 1/4" apart and 3/4" deep. Hand-sew running stitches down center of felt between cut edges. Gather edges together and wrap thread tightly around center. Secure end of thread in a knot. Fluff pom-pom. Hot glue pom-pom to back of bunny.
Step 7. BOW - Tie a 11/4" x 20" piece of fabric or ribbon around neck.
18" x 22 1/2" Brown Sugar craft cut (or color of your choice) for body Creamy White (or color of your choice) for tummy and muzzle
1" x 20" remnant of fabric or ribbon
Poly-pellets by Fairfield
Poly-Fil by Fairfield
1/4" black pom-pom
Two 4mm black round beads
Brown Animal Whiskers by One and Only Creations
19 gauge black wire
Black thread
Powder Blush (optional)
Hot glue gun / glue sticks
Doll needle
Read all instructions carefully before beginning. Instructions are for smaller rabbit which measures 10" in length from tip of ear to toe. Enlarge PATTERN 200% for larger rabbit which measures 20" in length from tip of ear to toe.
WRST = With Right Sides Together
RSO = Right Sides Out.
Instructions:
Step 1. BODY - Using a double thickness of Brown Sugar Shaggy Plush Felt, trace around pattern on wrong side of one layer of felt. WRST sew along traced lines. Cut out body by cutting 1/4" from stitching. Clip inward corners. Cut a slit between circles through one layer of felt only. Turn RSO through slit. Stuff each leg half full with Poly-fill. Sew along dashed lines between legs and body. Fill bottom with 1/4 cup of Poly-pellets. Stuff remaining body with Poly-Fil. Hand-sew opening closed.
Step 2. ARMS - WRST, use a double thickness of Brown Sugar Shaggy Plush Felt. On wrong side of one piece of felt, trace around pattern. Invert pattern and trace around for other arm. WRST sew along traced lines. Cut out arms 1/4" from stitching. Cut a small slit between circles through one layer of felt only. Turn RSO through slit and stuff arms half full with Poly-fill. Hand-sew openings closed. Thread doll needle with a long piece of double strand thread. Knot ends together leaving a 5" tail. Position arms at sides of body in shoulder area. Insert needle into one arm at upper circle. Push needle through body piercing other arm at upper circle. Pull arms snugly to body. Turn and insert needle again at circle, pushing needle through body to other arm. Repeat 2-3 times. Secure ends of remaining thread and tail together in a double knot. (Optional: Hot glue arms to sides of body.)
Step 3. EARS - WRST, use a double thickness of Shaggy Plush Felt-one of Brown Sugar and one of Creamy White. On wrong side of one piece of felt trace around pattern. Invert pattern and trace around for other ear. WRST sew along traced lines leaving lower edges open. Cut out ears 1/4" from stitching. Turn RSO through opening. Cut two 8" pieces of 19 gauge black wire. Shape to form ears by inserting wire into felt ears. Overlap and secure ends of wire. Whip stitch lower openings closed. Hand-sew ears to head. Apply blush to center of ears (optional). Bend ears as desired.
Step 4. FACE - Cut muzzle from Creamy White Shaggy Plush Felt. Hand-sew (slip stitch) to face, placing a small amount of Poly-Fil under muzzle as you sew. Using two strands of black thread make a long straight stitch down center of muzzle. For eyes hand-sew two 4 mm black beads to face. Hot glue 21/2" strands of Animal Whiskers to face. For nose, hot glue pom-pom over whiskers. Apply blush to cheeks (optional).
Step 5. BELLY - Cut belly from Creamy White Shaggy Plush Felt. Hand-sew (slip stitch) belly to body front.
Step 6. TAIL - To form pom-pom for tail, cut a 2" x 3" piece of Creamy White Shaggy Plush Felt. Along both 3" sides, cut strips of felt every 1/4" apart and 3/4" deep. Hand-sew running stitches down center of felt between cut edges. Gather edges together and wrap thread tightly around center. Secure end of thread in a knot. Fluff pom-pom. Hot glue pom-pom to back of bunny.
Step 7. BOW - Tie a 11/4" x 20" piece of fabric or ribbon around neck.
