
Christmas Mouse Felt Sewing Pattern
Christmas Mouse Felt Sewing Pattern
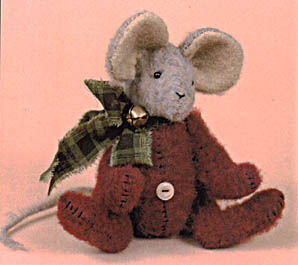
Materials:
Materials:
Rainbow Plush Felt:
1/4 yd. Red
1/4 yd. (or less) Tan
Rainbow Classic Felt: 4" x 4" square Ivory
1 button
2 tiny wooden beads (eyes)
1, 1/2" jingle bell
1, 1" strip of calico or ribbon
Black pearl floss
Instructions:
Step 1: Cut pattern pieces out. REMEMBER: cut opposite images of pieces when using plush felt. Flip each piece over so you achieve this.
Step 2: Pin pattern pieces together with their "mates" - plush side in. I hand stitched this mouse using pearl floss - sew as you prefer. Leave openings to turn as shown. Stuff. Stitch openings shut.
Step 3: Stitch limbs to body, ears to head, head to body.
Step 4: Stitch "belly button" in place. Tie bell on ribbon around neck. Stitch eyes on.
Step 5: I brushed a little powder blush onto inner ears.
Step 6: Cut a 6"-8", 1/4 strip of tan felt, trip one end to a point. Stitch it on to mouse's rump.
This mouse could certainly be in his everyday clothes to all tan. By altering the ears somewhat, this pattern also makes a cute bunny. As seen here, fold ear as shown, gather bottom slightly and attach to head.
