
Window Scarf Sewing Pattern
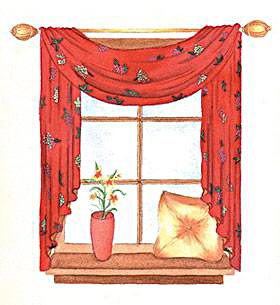
Window Scarf Sewing Pattern
Measuring and Cutting Instructions
1. Purchase and Mount Rod
Measure the width of the window from outside edges of moldings. Choose a decorative rod, equal to, or as much as 6" longer than window width. Choose a rod with decorative finial ends and one which does not bend and return to the wall. Mount the rod centered on the wall above the window and approximately 3 to 6 inches above the top window molding.
2. Measure Window
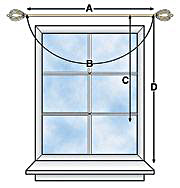
Using a flexible tape measure, record 4 window measurements.
A. Measure the length of the rod between finials.
B. Measure the degree to which you would like the swag to droop. For an easy measuring method, tie a string between the finials and allow it to drop 1/4 to 1/3 down the length of the window. Stand back and view the drop from a distance for a better perspective. Remove the string, then measure and record its length.
C. Starting at the top of the rod, measure 1/2 to 3/4 the length of the window for the inside length of the tail. A shorter inside length will allow for a sharper cascade and more lining fabric to show.
D. Measure the outside length of the tail from the top of the rod to the top of the window sill.
3. Trim Fabric Widths
Measure between the selvage edges to determine the usable-widths of both fabrics. If the fabric widths are identical, trim only the selvages from the fabrics. If they are unequal in width, trim the selvages and however much more is needed from the wider width to create two fabrics of identical widths.
4. Draw and Cut Pattern
Using the instructions that follow, draw a paper pattern or measure and draw directly on your fabric. Consider drawing on your easy-to-see, solid color lining fabric rather than the print decorator fabric - then use the lining as a pattern to cut the print fabric.
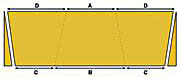
Using the measurements recorded earlier, measure and mark the distance equal to A in the center and distance D at each end, along one long edge of fabric. Measure and mark distance B in the center and a C at each end, along the opposite long edge of fabric. At each end, draw a line from the end of D to the end of C and trim the excess fabric. On the right side of the decorator fabric, using the soluble pen, mark a dotted 3gathering2 line between the outside ends of A and B as illustrated.
Note: For yardage requirements, record all measurements, then add together the length of A plus two D lengths. Purchase that amount for decorator fabric and for lining. For fabrics that feature large prints, purchase additional fabric to ensure the dominant feature of the print can be adjusted to the center position of the swag before cutting. Also - be aware that printed fabrics with an obvious one-way direction will appear standing up on one tail, lying side ways on the swag portion and upside down on the remaining tail.
Assembly Instructions
5. Stitch Fabric to Lining
With right sides of fabric facing and all edges even, pin lining to fabric along all edges. Following a 1/2" seam allowance, stitch fabrics together along all edges leaving an approximate 10" opening near the center of one long edge. Clip corners of seam allowance and press seams open. Turn assembly through opening to right side. Press assembly flat and hand stitch opening closed.
6. Mount Treatment on Rod
When it comes to positioning this swag treatment on the curtain rod, your personal handling of the fabric will determine it1s final shape and drape.
For quick and easy mounting, consider creating the gathers or pleats while the fabric is flat on your table or floor, then moving it up to the rod.
For Casual Gathers - Place the assembly flat and right side up on a large table or the dust-free floor. Using both hands, gather the fabric along each marked gathering line and carry it up to the rod. Position the swag in front of the rod and the tails behind.
For Tailored Pleats - Begin with the assembly wrong side up on a table or the floor. Create accordion-like folds, approximately 6" wide, that run the length of the assembly. Using both hands, pick up the fabric in the area of the marked gathering line and carry it up to the rod. Position the swag in front of the rod and the tails behind.
In both cases, pull down on the center of the swag to create a graduated drape and twist and spread the fullness of each tail to display the cascade until you are satisfied with the results.
1. Purchase and Mount Rod
Measure the width of the window from outside edges of moldings. Choose a decorative rod, equal to, or as much as 6" longer than window width. Choose a rod with decorative finial ends and one which does not bend and return to the wall. Mount the rod centered on the wall above the window and approximately 3 to 6 inches above the top window molding.
2. Measure Window
Using a flexible tape measure, record 4 window measurements.
A. Measure the length of the rod between finials.
B. Measure the degree to which you would like the swag to droop. For an easy measuring method, tie a string between the finials and allow it to drop 1/4 to 1/3 down the length of the window. Stand back and view the drop from a distance for a better perspective. Remove the string, then measure and record its length.
C. Starting at the top of the rod, measure 1/2 to 3/4 the length of the window for the inside length of the tail. A shorter inside length will allow for a sharper cascade and more lining fabric to show.
D. Measure the outside length of the tail from the top of the rod to the top of the window sill.
3. Trim Fabric Widths
Measure between the selvage edges to determine the usable-widths of both fabrics. If the fabric widths are identical, trim only the selvages from the fabrics. If they are unequal in width, trim the selvages and however much more is needed from the wider width to create two fabrics of identical widths.
4. Draw and Cut Pattern
Using the instructions that follow, draw a paper pattern or measure and draw directly on your fabric. Consider drawing on your easy-to-see, solid color lining fabric rather than the print decorator fabric - then use the lining as a pattern to cut the print fabric.
Using the measurements recorded earlier, measure and mark the distance equal to A in the center and distance D at each end, along one long edge of fabric. Measure and mark distance B in the center and a C at each end, along the opposite long edge of fabric. At each end, draw a line from the end of D to the end of C and trim the excess fabric. On the right side of the decorator fabric, using the soluble pen, mark a dotted 3gathering2 line between the outside ends of A and B as illustrated.
Note: For yardage requirements, record all measurements, then add together the length of A plus two D lengths. Purchase that amount for decorator fabric and for lining. For fabrics that feature large prints, purchase additional fabric to ensure the dominant feature of the print can be adjusted to the center position of the swag before cutting. Also - be aware that printed fabrics with an obvious one-way direction will appear standing up on one tail, lying side ways on the swag portion and upside down on the remaining tail.
Assembly Instructions
5. Stitch Fabric to Lining
With right sides of fabric facing and all edges even, pin lining to fabric along all edges. Following a 1/2" seam allowance, stitch fabrics together along all edges leaving an approximate 10" opening near the center of one long edge. Clip corners of seam allowance and press seams open. Turn assembly through opening to right side. Press assembly flat and hand stitch opening closed.
6. Mount Treatment on Rod
When it comes to positioning this swag treatment on the curtain rod, your personal handling of the fabric will determine it1s final shape and drape.
For quick and easy mounting, consider creating the gathers or pleats while the fabric is flat on your table or floor, then moving it up to the rod.
For Casual Gathers - Place the assembly flat and right side up on a large table or the dust-free floor. Using both hands, gather the fabric along each marked gathering line and carry it up to the rod. Position the swag in front of the rod and the tails behind.
For Tailored Pleats - Begin with the assembly wrong side up on a table or the floor. Create accordion-like folds, approximately 6" wide, that run the length of the assembly. Using both hands, pick up the fabric in the area of the marked gathering line and carry it up to the rod. Position the swag in front of the rod and the tails behind.
In both cases, pull down on the center of the swag to create a graduated drape and twist and spread the fullness of each tail to display the cascade until you are satisfied with the results.
