
Shower Curtain Sewing Pattern
Shower Curtain Sewing Pattern
1. Measure Opening
A standard shower curtain measures 72" X 72". For the finished curtain width, measure the length of your curtain rod to be sure it does not exceed this measurement. For the finished curtain length, measure from the rod to approximately half way down the sides of the tub. If you are outfitting a stall shower, the finished curtain will be slightly narrower and longer than standard. Note: You may only need one width of fabric for a shower stall - piecing of panels may not be necessary.
2. Cut Each Panel
Because the width of a standard sized curtain exceeds the width of the fabric, two panels of fabric will need to be sewn together to create one wide curtain. For a balanced effect, allow one whole panel in the center and split the remaining panel on either side.
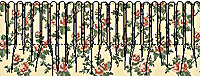
On fabrics with a large print design as shown, note the pattern repeat on the fabric and match the design at the seams before cutting each panel to length. Some fabric may be wasted to match the print correctly.
On a standard shower curtain the cutting length of a single panel should equal 72" finished length of curtain plus 16" for an upper and lower hem plus one fabric pattern repeat. Cut two panels this length with printed design matching at side edges.
finished curtain length + 16" for hems + one fabric pattern repeat
3. Sew Panels Together
Trim the selvage edge from the panels. Cut one of the panels in half lengthwise. With right sides of fabric facing, pin and stitch two half panels to either side of full panel. Remember to match the printed design with plenty of pins before stitching seams. Press seams open and clean finish edges.
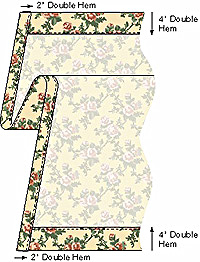
4. Cut and Hem Curtain To Size
Following perfect right angles cut sewn panel to measure 80" wide X 88" long.
Turn up and press 8" on upper edge of curtain. Tuck in cut edge to meet crease and press again creating a 4" double thickness hem. Topstitch through all layers of fabric along inside fold. Repeat for lower edge of curtain.
Turn up and press 4" on side edge of curtain. Tuck in cut edge to meet crease and press again creating a 2" double thickness hem. Topstitch through all layers of fabric along inside fold. Repeat for remaining side edge of curtain.
5. Grommets or Buttonholes Header
To accommodate the 12 decorative rings, you will need to make 12 buttonholes or apply 12 metal grommets. Using a water soluble fabric pen, mark the location of each opening. Each mark on the right side of the curtain should measure 1" from the finished top edge of the curtain. The first and last mark should measure 3" from the finished side edge of the curtain (within the side and top hems) and the remaining 10 openings should measure 6" between each.
Following your buttonholer instruction guide or grommet package instructions apply each to the markings.
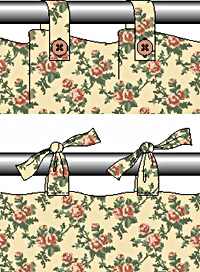
6. Buttoned or Tied Tab Header
No shower rings are needed with this style header. Using a water soluble fabric pen, mark the location of each opening. Mark the curtain on both the front and back side indicated below. The marks for the buttoned tab should measure 1" from the finished top edge of the curtain on the front side and 1/4" from the finished top edge of the curtain on the back side. The marks for the tied tab should measure 1/4" from the finished top edge of the curtain on both the front and back side. The first and last mark should measure 3" from the finished side edge of the curtain (within the side and top hems) and the remaining 10 openings should measure 6" between each. Note: A standard curtain will have 24 marks.
The cutting width of the fabric tab is 4". The cutting length is 7" ( for a longer more decorative tied tab add a few inches to this measurement). From fabric, cut 12 tabs for button-on variety and 24 tabs for tied-on variety.
Fold the tab in half lengthwise with the right sides of fabric facing. Stitch the long edges together following a 1/2" seam allowance, leaving a 2" opening in the center. Position the seam down the center of the tab and press it open. Stitch together seperately each open end of the tab and turn tab to the right side. Hand stitch opening closed and press tab flat . Repeat for remaining tabs.
For tied tab, stitch a pair of tabs to the front and back of the curtain at the marked locations.
For buttoned tab, stitch a buttonhole in one end and stitch the opposite end to the back side of the curtain at the marked locations. Stitch on a button to the front side of the curtain at the marked locations.

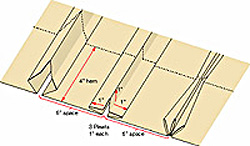
7. Triple Pleated Header
For the Triple Pleated Header, a fabric panel twice as wide as a standard shower curtain will be needed. Piece 3 whole panels of fabric together, cut the assembled curtain 148" wide and hem all edges as instructed. Measure and construct your own triple pleating as instructed below or use purchased pleater tape which has all the markings and folds built in.
The spacing remains the same as a standard curtain but an additional 6" is added for the construction of each pleat. The first and last mark should measure 3" from the finished side edge of the curtain (within the side and top hems) and the remaining 11 spaces and 12 pleats require 6" of fabric each.
3" end space + 3" end space + (11 spaces X 6") + (12 pleats X 6") = 144" finished width
8. Pencil Pleated Header
The Pencil Pleated Header can require a fabric panel almost 2 1/2 times the width of a standard shower curtain. It provides a very full and lush curtain and is recommended only in large rooms. You will need to piece 3 to 4 whole panels of fabric together and cut the assembled curtain to equal the length of the pleated tape plus side hem allowances. The flat tape is simply sewn at top and bottom edge to the top hem of the curtain. Cords are then drawn to gather the tape and fabric in even, pencil thin pleats. Experiment with the tape you purchase by stitching and gathering a short length to determine the ratio of a flat section to a gathered section. This will help to determine how wide your flat curtain should be to fill the space once it is gathered.
A standard shower curtain measures 72" X 72". For the finished curtain width, measure the length of your curtain rod to be sure it does not exceed this measurement. For the finished curtain length, measure from the rod to approximately half way down the sides of the tub. If you are outfitting a stall shower, the finished curtain will be slightly narrower and longer than standard. Note: You may only need one width of fabric for a shower stall - piecing of panels may not be necessary.
2. Cut Each Panel
Because the width of a standard sized curtain exceeds the width of the fabric, two panels of fabric will need to be sewn together to create one wide curtain. For a balanced effect, allow one whole panel in the center and split the remaining panel on either side.
On fabrics with a large print design as shown, note the pattern repeat on the fabric and match the design at the seams before cutting each panel to length. Some fabric may be wasted to match the print correctly.
On a standard shower curtain the cutting length of a single panel should equal 72" finished length of curtain plus 16" for an upper and lower hem plus one fabric pattern repeat. Cut two panels this length with printed design matching at side edges.
finished curtain length + 16" for hems + one fabric pattern repeat
3. Sew Panels Together
Trim the selvage edge from the panels. Cut one of the panels in half lengthwise. With right sides of fabric facing, pin and stitch two half panels to either side of full panel. Remember to match the printed design with plenty of pins before stitching seams. Press seams open and clean finish edges.
4. Cut and Hem Curtain To Size
Following perfect right angles cut sewn panel to measure 80" wide X 88" long.
Turn up and press 8" on upper edge of curtain. Tuck in cut edge to meet crease and press again creating a 4" double thickness hem. Topstitch through all layers of fabric along inside fold. Repeat for lower edge of curtain.
Turn up and press 4" on side edge of curtain. Tuck in cut edge to meet crease and press again creating a 2" double thickness hem. Topstitch through all layers of fabric along inside fold. Repeat for remaining side edge of curtain.
5. Grommets or Buttonholes Header
To accommodate the 12 decorative rings, you will need to make 12 buttonholes or apply 12 metal grommets. Using a water soluble fabric pen, mark the location of each opening. Each mark on the right side of the curtain should measure 1" from the finished top edge of the curtain. The first and last mark should measure 3" from the finished side edge of the curtain (within the side and top hems) and the remaining 10 openings should measure 6" between each.
Following your buttonholer instruction guide or grommet package instructions apply each to the markings.
6. Buttoned or Tied Tab Header
No shower rings are needed with this style header. Using a water soluble fabric pen, mark the location of each opening. Mark the curtain on both the front and back side indicated below. The marks for the buttoned tab should measure 1" from the finished top edge of the curtain on the front side and 1/4" from the finished top edge of the curtain on the back side. The marks for the tied tab should measure 1/4" from the finished top edge of the curtain on both the front and back side. The first and last mark should measure 3" from the finished side edge of the curtain (within the side and top hems) and the remaining 10 openings should measure 6" between each. Note: A standard curtain will have 24 marks.
The cutting width of the fabric tab is 4". The cutting length is 7" ( for a longer more decorative tied tab add a few inches to this measurement). From fabric, cut 12 tabs for button-on variety and 24 tabs for tied-on variety.
Fold the tab in half lengthwise with the right sides of fabric facing. Stitch the long edges together following a 1/2" seam allowance, leaving a 2" opening in the center. Position the seam down the center of the tab and press it open. Stitch together seperately each open end of the tab and turn tab to the right side. Hand stitch opening closed and press tab flat . Repeat for remaining tabs.
For tied tab, stitch a pair of tabs to the front and back of the curtain at the marked locations.
For buttoned tab, stitch a buttonhole in one end and stitch the opposite end to the back side of the curtain at the marked locations. Stitch on a button to the front side of the curtain at the marked locations.
7. Triple Pleated Header
For the Triple Pleated Header, a fabric panel twice as wide as a standard shower curtain will be needed. Piece 3 whole panels of fabric together, cut the assembled curtain 148" wide and hem all edges as instructed. Measure and construct your own triple pleating as instructed below or use purchased pleater tape which has all the markings and folds built in.
The spacing remains the same as a standard curtain but an additional 6" is added for the construction of each pleat. The first and last mark should measure 3" from the finished side edge of the curtain (within the side and top hems) and the remaining 11 spaces and 12 pleats require 6" of fabric each.
3" end space + 3" end space + (11 spaces X 6") + (12 pleats X 6") = 144" finished width
8. Pencil Pleated Header
The Pencil Pleated Header can require a fabric panel almost 2 1/2 times the width of a standard shower curtain. It provides a very full and lush curtain and is recommended only in large rooms. You will need to piece 3 to 4 whole panels of fabric together and cut the assembled curtain to equal the length of the pleated tape plus side hem allowances. The flat tape is simply sewn at top and bottom edge to the top hem of the curtain. Cords are then drawn to gather the tape and fabric in even, pencil thin pleats. Experiment with the tape you purchase by stitching and gathering a short length to determine the ratio of a flat section to a gathered section. This will help to determine how wide your flat curtain should be to fill the space once it is gathered.
