
Lunch Sack Sewing Pattern
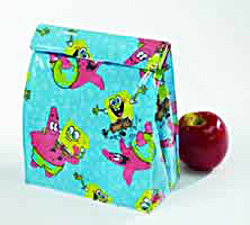
Lunch Sack Sewing Pattern
Materials
1/2 yard of fabric(can be coated in vinyl)
1" piece of Velcro
Instructions
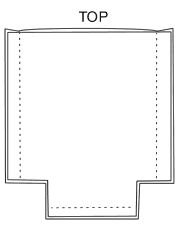
Step 1: Cut two rectangles 15 1/2" long x 12" wide from desired fabric. Cut 2" x 2" square from the bottom right and left corners of fabric rectangles.

Step 2: Use 1/2" seam allowance unless noted. For fabrics which do not ravel, press or finger press seams open. For fabrics which tend to ravel, do not open seams. Use a zig-zag stitch along raw edges. Pin bag front and bag back, right sides together. Stitch right and left side seams. Stitch bottom seam.
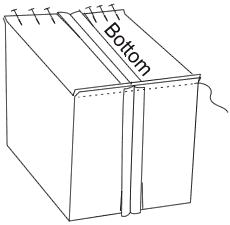
Step 3: Pull bag front away from bag back at bottom corners. Matching bottom seam and side seam, pin bag bottom to bag side
Step 4: Turn bag right side out.
Step 5: Top Edge: Turn top edge under 1". Pin. Stitch close to raw edge.
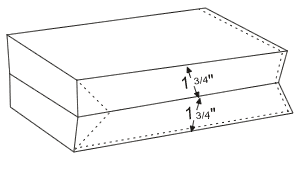
Step 6: Side creases: Place bag on a flat surface. Measure 1 3/4" from side seam. Crease (or finger press) bag from top edge to bottom. Since backpack nylon cannot be ironed, stitch along crease as close as possible to fold, catching bag front and back. Repeat for remaining three side creases.
Step 7: Velcro: Cut 1 1/2" length of Velcro. Position and pin the "soft" Velcro piece to the front of the bag, centered 1/2" from the top edge. Stitch. Position and pin the "rough" Velcro piece to the back of the bag, centered approximately 3": from the top edge. Stitch.
1/2 yard of fabric(can be coated in vinyl)
1" piece of Velcro
Instructions
Step 1: Cut two rectangles 15 1/2" long x 12" wide from desired fabric. Cut 2" x 2" square from the bottom right and left corners of fabric rectangles.
Step 2: Use 1/2" seam allowance unless noted. For fabrics which do not ravel, press or finger press seams open. For fabrics which tend to ravel, do not open seams. Use a zig-zag stitch along raw edges. Pin bag front and bag back, right sides together. Stitch right and left side seams. Stitch bottom seam.
Step 3: Pull bag front away from bag back at bottom corners. Matching bottom seam and side seam, pin bag bottom to bag side
Step 4: Turn bag right side out.
Step 5: Top Edge: Turn top edge under 1". Pin. Stitch close to raw edge.
Step 6: Side creases: Place bag on a flat surface. Measure 1 3/4" from side seam. Crease (or finger press) bag from top edge to bottom. Since backpack nylon cannot be ironed, stitch along crease as close as possible to fold, catching bag front and back. Repeat for remaining three side creases.
Step 7: Velcro: Cut 1 1/2" length of Velcro. Position and pin the "soft" Velcro piece to the front of the bag, centered 1/2" from the top edge. Stitch. Position and pin the "rough" Velcro piece to the back of the bag, centered approximately 3": from the top edge. Stitch.
