
Fabric Gift Basket
Fabric Gift Basket
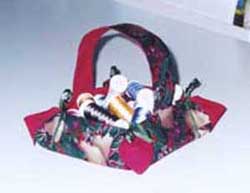
Make this pretty little fabric basket for presenting small gifts to a friend. It's also great for holding wrapped candies on the coffee table.
Tools & Supplies
Print fabric, fat quarter
Solid fabric to coordinate with print, fat quarter
Firm fusible interfacing, fat quarter
Strip of needlepunched quilt batting, 1.5 by 9 inches
Narrow ribbon to coordinate with print fabric, 2.2 yards
9.5-inch square ruler
Rotary cutter
Cutting mat
Iron
Pressing surface
Large Fasturn tube
Cotton thread to match each fabric
Sewing machine
Small scissors
Pins
Wooden chopstick or bamboo point presser
Instructions
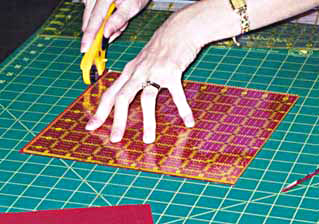
Cut a 9.5-inch square from each fabric. Cut a 2- by 9.5-inch strip from each fabric, for the basket handle. Cut a 9-inch square from the interfacing.
Fuse the interfacing to the wrong side of the print-fabric square, following the manufacturer's directions for fusing.
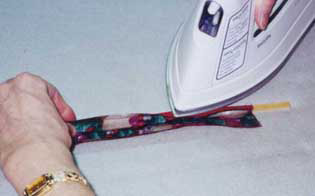
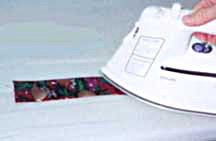
With right sides together, using a 1/4-inch seam allowance, stitch the handle pieces down the long sides. Press flat. Slip a wooden chopstick inside the tube and press each seam allowance to one side.
Place the Fasturn tube inside the fabric tube. Thread the Fasturn hook through the tube and catch both the top of the fabric tube and the top of the batting strip. Carefully pull the fabric and the batting together through the Fasturn tube, so the batting ends up on the inside of the basket handle.
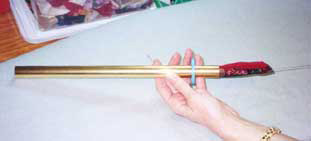
Adjust the batting so there's a 1/4-inch space with no batting at each end of the handle. Press flat.
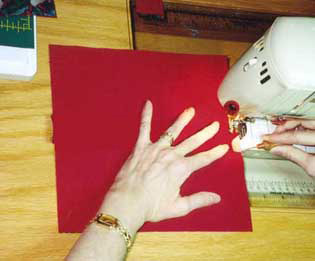
Place the two fabric squares right sides together, with the handle sandwiched between them. Be sure the handle is centered and the print side of the handle is against the print side of the basket. Use a 1/4-inch seam allowance to stitch the layers together, leaving a 2-inch gap where one end of the handle lies Stitch again with tiny stitches (about 20 per inch, or setting 1) at the corners, pivoting the fabric and taking two tiny stitches across each corner. This will help you create sharp corners when you turn the fabric right side out.
Trim across the corners, close to the stitching. Press.
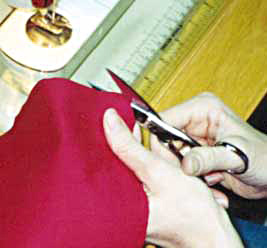
Turn the basket right side out through the opening. Use a chopstick or point presser to poke the corners and edges all the way out, pressing as you go.
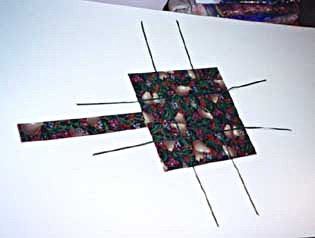
Cut four pieces of ribbon about 19 inches long, angling the ends. Lay the ribbon on the print side of the fabric, about 2.5 inches from each edge, and stitch to the basket with a zigzag.
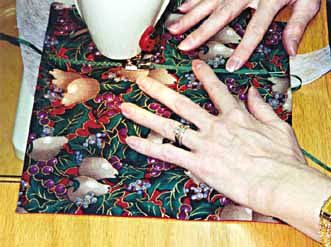
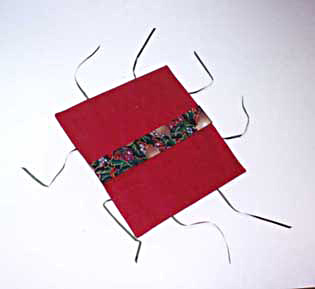
The basket will now look like this, with one end of the handle still unattached.
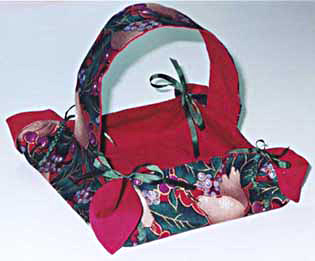
Press the raw end of the handle under by 1/4 inch. Slip the end into the gap in the basket edge, centering carefully, and pin securely. Edgestitch all around the basket, being careful not to catch the handle in your stitching anywhere except where the end is pinned into the opening. Press. Your basket will now look like this.
Tie the ribbons in a bow at each corner. Turn the corners down. You're done!
Tools & Supplies
Print fabric, fat quarter
Solid fabric to coordinate with print, fat quarter
Firm fusible interfacing, fat quarter
Strip of needlepunched quilt batting, 1.5 by 9 inches
Narrow ribbon to coordinate with print fabric, 2.2 yards
9.5-inch square ruler
Rotary cutter
Cutting mat
Iron
Pressing surface
Large Fasturn tube
Cotton thread to match each fabric
Sewing machine
Small scissors
Pins
Wooden chopstick or bamboo point presser
Instructions
Cut a 9.5-inch square from each fabric. Cut a 2- by 9.5-inch strip from each fabric, for the basket handle. Cut a 9-inch square from the interfacing.
Fuse the interfacing to the wrong side of the print-fabric square, following the manufacturer's directions for fusing.
With right sides together, using a 1/4-inch seam allowance, stitch the handle pieces down the long sides. Press flat. Slip a wooden chopstick inside the tube and press each seam allowance to one side.
Place the Fasturn tube inside the fabric tube. Thread the Fasturn hook through the tube and catch both the top of the fabric tube and the top of the batting strip. Carefully pull the fabric and the batting together through the Fasturn tube, so the batting ends up on the inside of the basket handle.
Adjust the batting so there's a 1/4-inch space with no batting at each end of the handle. Press flat.
Place the two fabric squares right sides together, with the handle sandwiched between them. Be sure the handle is centered and the print side of the handle is against the print side of the basket. Use a 1/4-inch seam allowance to stitch the layers together, leaving a 2-inch gap where one end of the handle lies Stitch again with tiny stitches (about 20 per inch, or setting 1) at the corners, pivoting the fabric and taking two tiny stitches across each corner. This will help you create sharp corners when you turn the fabric right side out.
Trim across the corners, close to the stitching. Press.
Turn the basket right side out through the opening. Use a chopstick or point presser to poke the corners and edges all the way out, pressing as you go.
Cut four pieces of ribbon about 19 inches long, angling the ends. Lay the ribbon on the print side of the fabric, about 2.5 inches from each edge, and stitch to the basket with a zigzag.
The basket will now look like this, with one end of the handle still unattached.
Press the raw end of the handle under by 1/4 inch. Slip the end into the gap in the basket edge, centering carefully, and pin securely. Edgestitch all around the basket, being careful not to catch the handle in your stitching anywhere except where the end is pinned into the opening. Press. Your basket will now look like this.
Tie the ribbons in a bow at each corner. Turn the corners down. You're done!
