
Plastic Canvas Box Pattern
Plastic Canvas Box Pattern
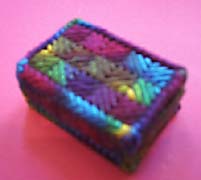
This box is small, 1 by 1 3/4 by 2 1/2 inches. It has a drawer that pulls out like a matchbox for keeping special treasures. It is made by stitching small separate pieces of plastic canvas and then stitching the pieces together to make an outside box cover and an inside drawer.
There are three ways to make this box. First, you can stitch it all in one color (Variation 1). Second, you can stitch the outside in one color and the inside drawer in a complementary color (Variation 2). Third, you can stitch the outside and the inside drawer in one color and bind it together using a complementary color (Variation 3).
What you will need:
Watercolors Thread: either two skeins of one color, or two complementary skeins
Scissors for cutting thread
Scissors for cutting plastic canvas
Plastic canvas: one sheet of 7-count (this is enough to make more than one box)
Tapestry needle size 16
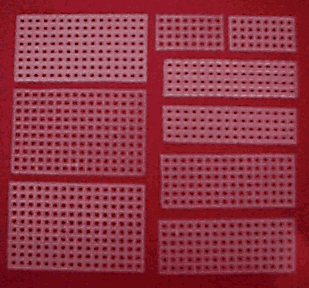
Step 1 - Cutting out the plastic canvas pieces
Cut the plastic canvas carefully into the following pieces using your scissors. Don't use the same scissors for cutting the plastic canvas that you will use to cut your threads. Cutting plastic canvas is hard on your scissors and you want to save your stitching scissors for cutting thread. After this, you can use your stitching scissors.
You should have nine pieces for each box. Be careful to trim off the spikes so your pieces are pretty smooth.
Outside box cover
Top and bottom - cut two pieces 11 by 17 bars
Outside sides - cut two pieces 7 by 17 bars
Inside box drawer
Bottom - cut one piece 9 by 17 bars
Inside short sides - cut two pieces 5 by 9 bars
Inside long sides - cut two pieces 5 by 17 bars
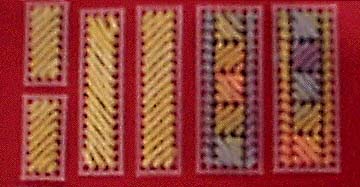
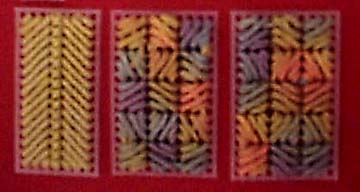
Below are what the stitched pieces look like before you assemble them.
Step 2 - Making the top and bottom of the outside of the box
Decide on variation 1, 2 or 3. Stitch the separate pieces using one strand of Caron Watercolors thread. If you follow the stitching charts below, you will have a box that looks nice on the front and the back also.
Thread one strand of Caron Watercolors thread into your size 16 tapestry needle. Use a piece of thread that is about 36 inches long. Leave about four inches hanging on the short side and when you pull the thread through the holes, hold the needle at the eye where the thread is doubled so that the thread doesn't come out of the needle.
To start a new thread the first time, count down to the third hole from the top on the right edge of the piece of plastic canvas you cut out for the top of the outside box. (See diagram A for starting point) Bring your needle up in that hole. Look at the diagram and notice that hole matches the diagram dot marked 1. Pull the thread through the hole but leave a short piece of thread (like an inch long) on the back side of the plastic canvas and hold onto it with your other hand (the one that doesn't have the needle in it). As you make the first four or five stitches, make sure that the loose end you are holding with your other hand on the back side is covered by your new stitches. Try to cover all that loose end up with your new stitches.
Diagram A (click image for larger version)
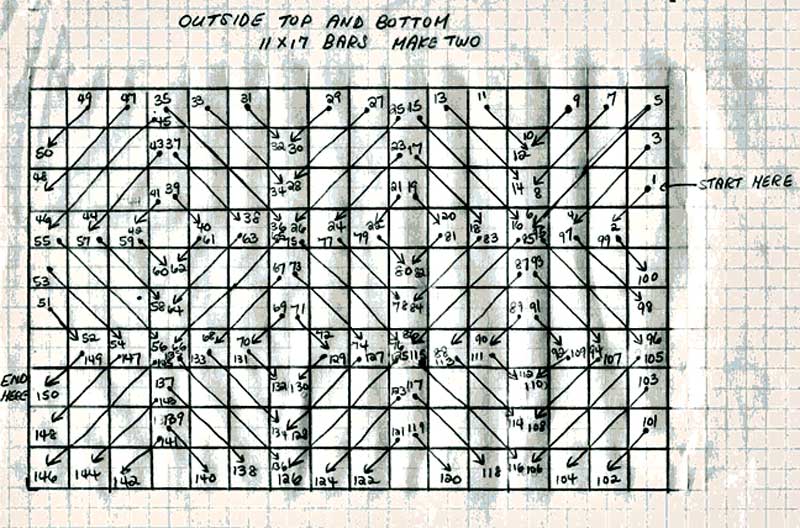
You should have come up with your needle from underneath the plastic canvas where the dot is numbered 1. Now, go down from the front to the back where the arrow is numbered 2. Then come up at 3 and go down at 4, and keep going until you have about 3 inches left of your thread or you are done with that piece of plastic canvas. When you are done with a thread, make sure your thread is now coming out of the back of the piece, and run the thread underneath in the back about 6 or 7 stitches so that it doesn't come loose later and then carefully cut off the extra thread.
Don't pull too tightly when you stitch but pull tightly enough so that the thread is not floppy loose on the front. You can use the pointer finger of your other hand to hold onto the last stitch you make so it doesn't get loose as you make the next stitch.
Notice that you always come up from the bottom at the odd numbers on the diagram and you always go down from the top at the even numbers on the diagram. Also notice that some stitches share the same hole, like 10 and 12 and some holes are shared four times, like the hole for stitches 6, 16, 85, and 95. See diagram A.
You are making a pattern of little squares of 5 stitches, each square going in opposite directions from the one next to it. This stitch is called the Alternating Scotch Stitch.
Try not to end a thread in the middle of a little square. Try to end a thread after you finish a little square even if you have a little extra thread left over. This makes your colors come out nicer.
When you get to stitch 50, stitch 51 is below it on the next line. To make the back look nicer, while your thread is on the back of the plastic canvas, slip it under the two stitches you must go by on your way to stitch 51. The same thing happens when you get to stitch 100 and 101. See diagram A.
End your thread after your last stitch and then make another piece just like this one.
Now you have the top and bottom of the outside of your box stitched.
Step 3 - Making the sides of the outside of the box
Follow the stitching diagram below and stitch two outside sides. Start and stop your thread the same way as you did before. See diagram B.
Diagram B (click image for larger version)
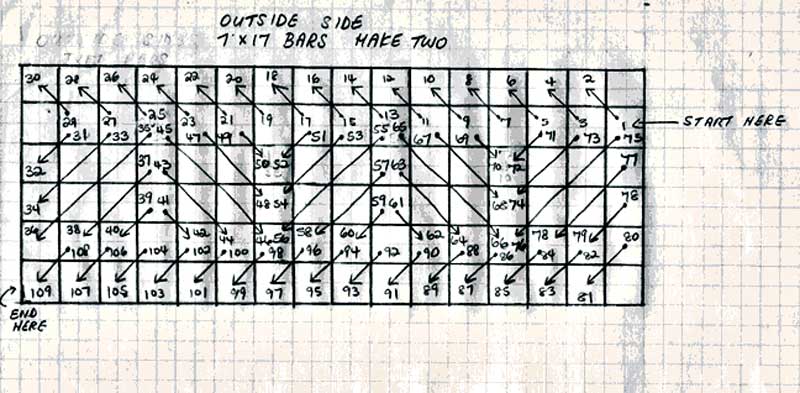
First stitch a row of Half Cross Stitches all the way across the top of your piece.
Then, stitch a row of Alternating Scotch Stitches like the ones on the top and bottom of the box cover that you just stitched before.
Then stitch another row of Half Cross Stitches all the way across the bottom of your piece.
You can make this row slant the same way as the row on the top of your piece or in the other direction.
Step 4 - Making the sides of the inside box drawer
Next, stitch one inside short side and one inside long side following Diagram C. If you are careful to follow the diagram, you should be able to stitch one of each with 36 inches of thread. Then stitch another long and short side so that you have two of each.
For these sides, leave a longer tail and go through more stitches in the back to make sure your beginning and ending thread won't come loose later.
These are all stitched with slanted stitches and that stitch is called the Slanted Gobelin Stitch.
Diagram C (click image for larger version)
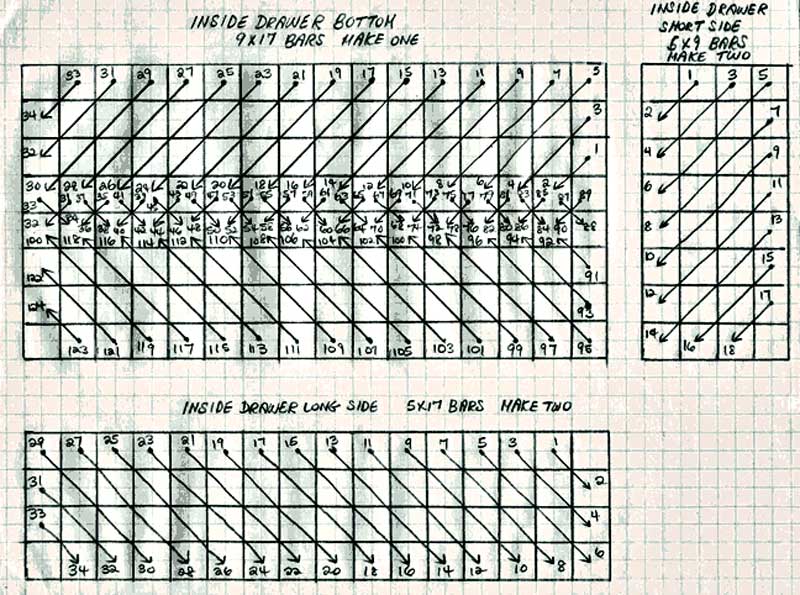
Step 5 - Making the bottom of the inside box drawer
Now follow Diagram C for the inside box drawer bottom. You will stitch a row of Slanted Gobelin Stitch followed by a row of Cross Stitch followed by another row of Slanted Gobelin Stitch. Notice that the slanted stitches are in different directions. This makes the inside box drawer bottom sort of look like a rib cage.
Step 6 - Putting the pieces together
Box Drawer
The box drawer has 5 pieces, a bottom, two long sides, and two short sides.
Diagram D
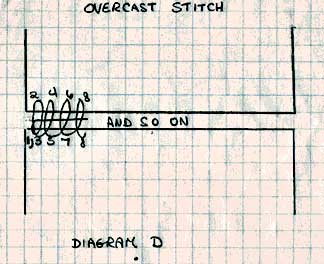
We are going to use overcasting to stitch the five pieces together. Cut a 36 inch piece of thread and put it in your needle.
Now stop and think about your box. Each side has a good side (the front) and a bad side (the back). Think about the finished box and imagine pulling the drawer open. You will be looking at the inside of the bottom of the drawer. So you want the good side of the bottom piece to be inside the drawer. But imagine holding the drawer in your hand and looking at it. Now you are looking at the outside of the drawer. So in your drawer, you want the front of your sides to be facing out but the front of your bottom to be facing in.
Diagram E
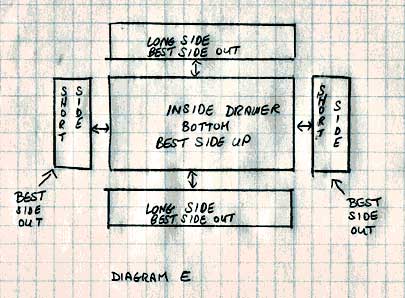
So pick out one side of your drawer and put it over the bottom of the drawer with both of the front sides on top of each other. Line them up so that they are even and the holes on the edges are also lined up. Bring your needle up at the end in between the two pieces by only going through the top piece and leave about an inch of thread in between the two pieces. Loop around the outside of the edges and come up in the matching hole of the piece underneath and through the same hole on the top piece that you just started with. Keep moving down one hole at a time, looping around the outside of the edges and going through both pieces from the back to the front. Make sure that you include the loose starting thread between your stitches so that is doesn't come loose later. When you get to the end of the side, pick up the next side and start attaching it but make that the right side is facing out just like the other one. Keep going all the way around the drawer until all four sides have been attached. See Diagram D.
Now bring two sides together at the corner and start overcasting over the top of one side until you get to the next corner. Bring those two sides together and stitch them together. Come back up to the top of the that side and keep overcasting until you get to the next corner. Keep doing this until all the edges of the drawer are covered with overcasting stitches. You might want to add extra stitches through the holes at the bottoms of the corners when you are there to cover more of the plastic canvas.
If you want to cover more of the plastic canvas, overcast through each hole twice. Don't double your thread because it will get too thick to work with.
When you run out of thread, bring it inside the drawer and run it back through 4 or 5 overcast stitches to make it secure. Start a new thread the same way as before and continue until the drawer is completely overcast.
Try not to go through any of the other stitches you made on your pieces, try to keep your thread only on the outside edges.
If you are having a problem starting a new thread with a tail and burying it in the new stitches, instead try working your thread through 5-6 nearby stitches so it doesn't come loose later.
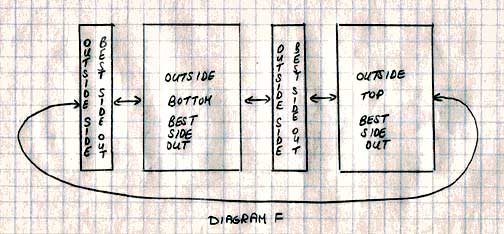
Outside of Box
The outside of the box has four pieces, the top and bottom and the two sides. You don't really see the inside of this box cover so when you put these pieces together you want to make sure that these pieces have their best sides facing out.
Diagram F
This can also be put together with the Overcast stitch.
But instead, you can use a Braided Binding Stitch. This is a very nice stitch because it is very pretty and it covers the plastic canvas better but it uses a lot more thread. In fact, if you really like it, you could put the drawer together using it too.
To use the Braided Binding Stitch, cut a 36 inch piece of thread and put it in your needle. Start out exactly the same as the Overcast stitch, by leaving a small tail in between the two pieces of the box cover, starting in between the two pieces, and overcasting the first three stitches. Make sure you are covering your loose end in between your stitches.
After you come out of the third hole, count back two holes, and loop backwards to the back of the first hole and come through to the front again. Then swing forward three holes, which is the next open hole, and come through again from the back to the front.
Diagram G
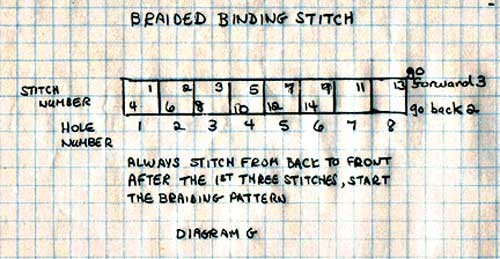
Keep going back two and forward three until you get to the last hole of that piece. Then go backwards two as usual but this time go forward only two and come out of the last hole again. Now go back one and forward one and come out of the same hole for the third time and then go through the last hole again from the back to the front. This gives you an unbroken braided edge that is very pretty.
Make sure this stitch is not too loose. Also notice that it goes in one direction and try to always go in the same direction. Don't forget to cover the open edge of the Box Cover with the same Braided Binding or Overcast Stitches.
When you get the end of a side, finish off your thread. Get another piece and bind it together. Bind each piece together and then go all around the outside edges of the box cover on both sides. When you get back to the beginning, continue braiding over the first few stitches so the braided pattern looks the same throughout.
The Braided Binding Stitch is always worked from the back to the front. It is easy to look at it and see if you have messed up the braiding pattern. If you decide to redo any of it, don't try to unsew it, take your thread off your needle, and undo your stitching by using your needle as a pick to gently unwind it from the outside one stitch at a time.
When you are done, the entire box cover should be covered with Braided Binding or Overcast Stitches.
Ending and Beginning a thread in the Braided Binding Stitch without breaking up the braiding pattern
When you come to the end of your thread, make sure you are in the middle of a backwards loop. Come up on the inside and run your thread through the back on the inside to make it secure and cut off the extra thread. Start a new thread by leaving a tail hanging to be covered as usual on the inside and coming out from the inside at exactly the place you would have come out next with the old thread. Continue your braiding pattern and make sure you cover your loose thread with your new stitches so that it doesn't come loose later.
Now slide your drawer into the cover and you are ready to keep your treasures safe.
