
Beading Tutorial
Beading Tutorial
- Tools and Supplies
- General Hints
- Using Jewelers Wire
- Using Needles For Stringing Thread
- Bead Tips
- Knotting Between Beads
- Attaching Clasps
- Endless Loop Stringing
- Knotted Endless Loop Stringing
- Making Beaded Ear Rings
- Making Beaded Pendants
Tools and Supplies - Some of the things you will need to get started.
Tools:
Jeweler's Needle Nose Pliers - A plier with a very small squared-off and tapered point. Used for numerous techniques.
Jeweler's Round Nose Pliers - Round nose with a very fine point. Used for making wire loops, especially in headpins for ear rings.
Jeweler's Flat Head Pliers - For setting jump rings.
Round Nose Pliers Flat Nose Pliers Side Cutter Pliers
Wire Cutters - For cutting jewelers wire or clasp connectors.
Side Cutters - Cutting plier with a vertical angle and thin cutting surface. Used for cutting knots between pearls or beads on completed strands that must be taken apart.
Reamers - Hand held reamer/file set. Used for widening and straightening the holes incorrectly drilled into beads or pearls.
Jewelers Tweezers - Extremely fine pointed tweezers. Used for picking up small objects. Also used for finishing off knots in bead tips and between pearls/beads.
Jeweler's Tweezers
Locking Tweezers - Many uses, including locking strands of beads or pearls when you do not wish to use a knot in the beading thread.
Beading Needles
Threads and Wire:
Jeweler's Wire - Wire and crimps. And perhaps a crimping tool.
Threading Materials:
Silk thread for beading - comes in various sizes and colors. Used mostly for pearls or with small mineral or gem beads with extremely small diameter holes. Note that holes in many gem and mineral beads will be either abrasive or have a sharp edge, which can cut or wear down silk beading thread. Never use with glass beads.
Silk thread for English needle leader.
Nylon or other synthetic beading thread - comes in various sizes and colors. Used for most mineral or glass bead strands. Withstands abrasion much better than silk.
French Wire - The purpose of French Wire is to protect beading thread from the abrasive effect of metallic loops or jump rings, which might otherwise eventually cut through the beading thread and destroy a bead strand. It is a hollow tube made up extremely narrow wire coiled together tightly, and it resembles a very small slinky with a tube diameter of a few millimeters. French Wire comes in three sizes (small, medium, large) and in gold and silver colors.
Supplies - Beads and Findings:
"Findings" is a trade term describing the supplies - usually metallic - that jewelers use. The term does NOT include tools and the beads themselves. Look at the Resource Page for some sources of supplies, and go to Marvin Schwab's Finding Page. for some picture examples. Remember that buying locally in small lots is good for beginners or casual beaders, but when you start planning numerous projects you will need to locate sources where you can purchase in larger lots and pay wholesale.
Findings made of base metal (silver or gold colored) are the cheapest to buy, and are great to beginning beaders and children. For better pieces use gold filled (a layer of gold stamped - not electroplated - over a base metal core) or sterling silver findings. The cost of sterling or gold filled findings is similar. For the best pieces (using the finest materials) use 14K gold findings.
IMPORTANT HEALTH NOTE: Base metal findings are made of a nickel alloy material that can cause serious allergic reactions in some people. Especially when used with pierced-ears. Those people sensitive to nickel alloys should use only 14K gold or high quality gold filled findings. Surgical steel findings are also available. Some sensitive people can also tolerate sterling silver.
Some common supplies you will need will include:
Beads - Mineral, gemstone, metallic, ceramic, organic (amber, pearl, bone, horn), glass, plastic. You name it, someone's got it.
Separators - Disks or other shapes used to separate individual beads from other beads on a strand. Usually smaller than the beads and metallic.
Clasps and terminators:
Bead tips - Simple metal termination devises for bead strands. Then attach the bead tips to clasps. The simplest form of bead tip is the cup tip, with a single cup to hold the termination knot in place.

Clam shell bead tips - Similar to cup bead tips, but with an extra cup for hiding the termination knot. Available in top and side styles. Usually used for larger sized beading threads that have larger termination knots..
Clasps - Barrel, fish hook, lobster claw, round spring ring. And jump rings to attach to the clasps (sometimes).


Ear Ring Supplies:
Head pins - For making columns of beads. Regular stands of beads can also be attached to ear posts or hoops to make ear rings.
Studs - Several styles are available (cup, post, ball etc). Also the pressure ear nuts needed to hold the studs in place.
Hoops - Several styles are available.
Ball Type Stud With Attachment Loop

French Ear Loop

Glues:
Jeweler's Glue - A fast drying solvent based glue with an extremely fine application tip. Used for gluing knots and making them permanent.
Jeweler's Epoxy - Standard (clear) fast setting 2-part epoxy. Used for permanently setting stones on posts or pin settings.
Organizational and Design Aids:
Design and/or Layout Boards - These boards contain channels for laying out beads during design and measuring phases. A design board uses circular channels to approximate the shape of a necklace while a layout board uses straight channels for laying long lines of beads. Both boards will have tick marks for measuring the length of bead strands, and both will have pockets for storing batches of needed findings or supplies. They come in either hard plastic surface or flock surface - the flocked surface is preferable as it is a short knap fuzzy surface that retards beads from bouncing or rolling, and you can stick beading needles in the flock when you are not using it (and so you can easily find it and pick it up again later).
Design Board
Organization drawers - Obtained from any hardware store. Organize all your material - beads, findings, whatever. Then maybe you will be able to locate your stuff when you need it. Small (pocket sized) fishing tackle boxes make good portable bead and finding organizers.
Small tool chest - For your tools and bulky items. And for your material square you use to store your beading needles.
General Hints
Please note that all beading and stringing jobs should follow the same basic steps:
Pearl, glass or semi-precious beads must either have a knot between them or have a spacer/disk. Spacers or disks should be metallic (gold, silver or brass) - plastic is OK for practise. Do not use a knot between a spacer/disk and a bead.
Lay out your beads on a design or layout board. Look for symmetry of design and how the final product will lie.
Estimate string length: for standard stringing use length times 2 plus 10 inches, for knotting use length times 4 plus 10 inches.
Dye string if necessary. Using permanent ink chisel tip markers works well.
Stringing material must be stretched overnight prior to final stringing - string all your beads and add any terminal clasps or bead tips you will need for your finished design. Hang the beads overnight. You can finish the piece or do your knotting the next day.
The fish hook clasp technique illustrated in these pages can only be used with clasps that have free-moving jump rings attached at both ends of the clasps - notice the jump rings in the illustrations. If your clasp does not have jump rings, you must use bead tips at each end of the strand and then bend the bead tip hook around the contact loop of the clasp. The reason for this is that without free-moving terminations, every day use of the necklace or bracelet will result in rubbing that will eventually wear out the termination and cause the strand to fall apart.
Final knots should be square knots made up of x3 half-hitch knots on alternating sides of the strand of beads (flipping over the strand between each half-hitch). Cutting one of the threads shorter than the other prior to knotting will help keep track of which thread is which (ex. short always over long). When the knot is done, dab both sides of the knot with jewelers glue to make permanent, let dry, then trim the knot closely.
In addition, follow these useful hints:
Always have a good light source to work with. Straining your eyes will shorten your beading career. I guarantee it.
If possible, have a free-standing lamp and magnifying glass available. Very useful for detailed jobs.
Keep your supplies and tools organized. And use a design board. See the Tools Page.
Work on a towel. This minimizes the beads from bouncing when you drop them - and you will. And so maybe you will be able to prevent them from bouncing off the table and onto the floor. And a light colored towel helps to locate smaller items again after you have dropped them.
You can stick your beading needles into the towel when you are not using them.
Using Jewelers Wire
Jeweler's wire, also known as Tiger Tail, is made of nylon coated woven stainless steel wire (ultra fine thickness). Coming in several thicknesses, 0.015 inch is good for bracelets while 0.018 or 0.021 inch is used for necklaces.
Wire is perhaps the easiest beading technique for beginning beaders to learn. But there are some significant drawbacks to using this style:
Beading wire tends to kink when flattened, leading to unsighlty hanging of bead strands.
Due to the stiffness of steel wire, bead strands - especially light pieces like pearls - will not follow the body contours easily.
Most importantly, once kinked, wire will tend to break at the kink point and the strand will separate.
Note: I have been informed by a recent visitor that some new wire products are available that avoid the problems associated with using Tiger Tail. These products, known as SoftFlex and Beadalon, are apparently softer and more versatile than the "old" Tiger Tail, and they don't do that kinking thing that is so irritating. I have not personally used these products, so I cannot vouch for them. But it is probably worthwhile giving them a try.
The best use of wire is for stringing very heavy strands of mineral or stone beads, especially ones with very large accent pieces. Another good use for wire beading is for bracelets made of light weight hollow gold or silver beads, the shape of which is supposed to be maintained in a circle and not just to hang off the wrist.
Because of the drawbacks in using wire for most jewelry purposes, the techniques shown on Bob's Beading Techniques pages will illustrate the use of beading thread (and not wire). However, below is the basic technique for using jeweler's wire:
Lay out your beads. Measure the amount of wire you need - the length of your beads plus 12 inches - and cut the length off the wire spool.
String a few of the beads.
On one end of the strand, thread a crimp onto the wire. So that the crimp is the last item on the strand. Then thread a clasp - the clasp is now the last item on the wire.
Loop the wire BACK THROUGH THE CRIMP. The clasp is now trapped in a loop of wire.
Push the end of the wire back into the end bead hole and push as much of the wire back through the bead(s) as possible.

Holding the beads and clasp firmly, pull on the long end of the wire to tighten the beads, crimp and clasp against each other.
When tight, use a fine tipped needle nose pliers to crush the crimp against the wire. Make sure that the two stands of wire are NOT TOUCHING EACH OTHER during crimp crushing stage - that they are separated from each other by as much space as possible. This end of the strand is now locked into place. A specialized crimping tool can be very effective for finishing the strand.
String the remaining beads of the strand and then terminate the remaining end with crimps as described above. Use a fine tipped wire cutter to clip off excess wire.
Using Needles For Stringing Thread
In order to string beads (or pearls), a double strand of beading thread must be threaded through the holes of the beads. Pulling the thread through the holes is far easier - and less damaging to the thread - than pushing, especially with the small diameter holes found in most beads (or pearls). In order to accomplish the pulling of the beading thread, needles are used to insert through the bead hole and then pull the beading thread afterwards. There are two basic types of beading needles in use:
Twisted Wire Needles - These are needles made of a loop fine grade (thin) steel wire twisted around itself to form a needle-like assembly. The needle will have a (non-twisted) loop at the end through which the beading thread is pushed. Then the loop is crushed closed to hold onto the beading thread and to make it small enough to fit through the bead holes.
English Beading Needles - These are needles in the conventional sense, but they are very slim and the threading hole is very narrow - much too narrow to take a conventional beading thread. In order to pull the beading thread, a second loop of very fine leader thread must be used:
Pull several inches of "A" sized silk thread (or "00" sized beading silk) through the hole in the beading needle. Using a conventional sewing needle wire threader devise can save time - be very careful and slow when drawing the threading devise wire loop and silk leader thread back through the needle hole or else the wire of the threading devise will cut the leader thread. A slow rocking motion is very helpful when first trying to get the wire and thread back through the beading needle hole.
Red colored silk helps seeing the leader thread during projects and helps discriminating the leader thread from the beading thread.
Once the leader thread has been successfully pulled through the needle hole, make sure you have enough thread to form a loop approximately 4-6 inches long. Tie the ends of the leader silk together with an overhand knot to close the loop.
Line up the knot of the leader loop so that it lies in the middle of the loop - and not at the end.
Draw the beading thread through either the wire needle loop or the leader thread of an English beading needle. Make sure you have enough beading thread to complete the job.
Make your beading thread loop by connecting the ends of the beading thread with an overhand knot (use a figure-eight knot if you intent to use bead tips).
Use your beading needle to inert through the beads and pull the beading thread through to the other side
When you are not using your needles, store them in a place where it is easy to find them again. Needles have a nasty habit of disappearing forever - or at least it seems like that - if you just lay them down and forget about them. I find that a square of dark colored felt or wool material makes a fine storage place foe needles - just stick the needles in the material and you can find them again later. And the dark color offsets the red of the attached leader thread.
Bead Tips - A simple technique for terminating a strand of beads.
Bead tips - also known as cup tips - are small findings used to terminate a strand of beads. The cup-like shape of the tip body is used to hold and hide a terminating knot (also known as attaching knots), and the extended arm of the tip is used to close around a jump ring or connector hole in a clasp.
Clam shell bead tips are similar to regular bead (cup) tips except that they have an additional cup attached to the main cup. Once the device has been attached the end of a strand of beads and the terminating knot has been made permanent, then the extra cup is pressed against the main cup to create a round bead-like assembly with the terminating knot completely hidden inside.
Using bead tips is one of the simpler techniques in beading. It also allows some flexibility in design because clasps can be attached to strands after the strand has been completed:
Prepare your needle assembly using a figure-eight knot to terminate the beading thread loop. The figure-eight knot is preferable to the overhand knot because it makes a bulkier knot, and so it is more difficult for the termination knot to get pulled back through the hole in the bead tip. However, if you are sure that your knot will not get pulled back, an overhand knot can be used because it is easier to make and lock in place than a figure-eight knot.
Figure 8 Knot
 Overhand Knot
Thread a bead tip or cup onto the bead thread loop. Make sure that the rounded part of the tip is facing inwards towards where the beads will go, and that the cup space and the extension arm is facing outwards. Slide the tip towards the terminating knot until the knot is snugged inside the cup.
Start threading your beads.

When the last bead has been strung, use your needle to attach the second bead tip. Remember that the tip should be facing in the opposite direction from the first tip. Snug the tip against the beads.
Remove the needle from the beading threading by cutting the beading thread AND NOT THE LEADER LOOP.
The remaining steps of attaching a last bead tip are similar to the steps used for knotting between beads:
Make a loose figure-eight knot in the beading thread as close to the bead tip as possible.
Insert your jewelers tweezers through the loop of the termination knot. While holding onto the beading thread, press the tips of the tweezers against the inside of the bead tip cup. This forces the last bead tip against the bead strand and tightens up the whole assembly.
While holding the beading thread and tweezers, walk the knot down the tweezers until it is as close to the bead tip and as tight as possible (starting with a large loop of thread is important for the success of this step). Remove the tweezers.
Pull the free ends of the beading thread in opposite directions to lock the knot tight.

Trim the loose bead thread from the knots at both ends of the strand and dab the knots with jewelers glue. Let dry. If you are are using a bead cup, press the side cup against the main cup to form your round termination assembly.
Attach a clasp or jump ring to the bead tip extension arm and - using your fine tipped needle nose pliers - close the arm securely to finish the bead strand. All attaching or terminating knots (the knots at the very ends of the strand inside the bead tip) should be glued with a dap of jeweler's cement to lock the knot. Do not use epoxy. Intervening knots (the knots between pearls or beads that make up the body of the strand) should NOT be glued.
Knotting Between Beads
Regardless of how you terminate your necklaces and the types of threading materials you use, certain materials require knots between beads. Pearls and mineral/gem beads should always have a knot between neighboring beads of the same types. When a pearl or mineral bead lies next to a spacer disk or a bead of a different type, a knot is not required.
Before starting to knot a strand, you will have to decide how the strand is to be finished or terminated: endless loop, bead tips, or a directly attached clasp. This decision will determine how you start and end the knotting process.
The following knotting technique is written for right-handed people - lefties just reverse the instructions:
Measure out the length of beading thread needed - bead length x4 plus 10 inches.
Following the process described on the Using Needles page, prepare your beading needle assembly.
Now is the time to decide how the strand will be finished:
If you will use a bead tip to terminate the strand, now is the time to start - use the needle to thread a bead tip and slide the tip along the strand towards the terminating (figure-eight) knot. Then thread all the remaining beads. After threading all the beads, thread another bead tip (facing the opposite way from the original).
If you will be making an endless loop, follow the instructions to form your terminating knots and single floater. Then thread all the remaining beads. If you will be using a directly attached clasp with floating jump ring, follow the instructions on the Attaching Clasps Page to thread, loop and snug the male part of a clasp. Then thread all the remaining beads or pearls.
Remove the needle from the beading thread by CUTTING THE BEADING THREAD at the very end of the loop. Immediately after removal of the needle, terminate the end of the beading loop with an overhand knot (figure-eight knot if using bead tips). Put your needle away for later use.
Hang the strand overnight to stretch the beading thread.
Start the knotting by sliding a bead all the way down towards to terminated end (bead tip or endless loop) or clasp end, making sure that the beading thread is even and does not have any kinks. Snug that bead.
Make an overhand knot LOOP (do not tighten it yet) between the end bead and the rest of the beads.
One way of doing so is:
Holding your left hand with palm up and fingers pointing inwards and up to form a cone-like shape.
Use your right hand to drop one end of the strand into the palm of your hand (through the top of the cone - use the end with the least number of beads).
Drape the beading thread loop around the outside of your fingers to form a cat's cradle-like loop of thread.
Use your right hand to pull the beaded end to the outside of your palm, out and over the loop, and drop the beaded end down inside the loop (still outside your fingers) and down back into the palm for your hand. This forms a large loose overhand knot.
Using your right hand, pinch the loop of the new knot-to-be between your thumb and pointer finger. Pull the entire assembly off your left and and onto your working surface.
Straighten out the strand with the knot end of the strand towards your right and the long tail of the beading thread loop (and remaining beads) on your left.
Work the loop of beading thread down towards the bead until it is a couple of inches from the bead and about an inch in diameter.

Using your thumb and forefinger, pinch the loop of the knot-to-be with your left hand.
Using your right hand, insert the tweezers through the loop of the beading thread knot and slide the thread leading to the bead through the open tips of the tweezers. The purpose of this is to get the side of the tweezers - at the tips of the tweezers - to press up against the bead with the thread between the tweezer tips. (Starting with a large loop of thread is important for the success of this step.)
Pull on the thread with your left hand to snug the bead tight up against the side of the tweezers. Then squeeze the tweezers (with your right hand) to lock the bead up against the tweezer tips.

Use your left hand to work the loose overhand knot down the tweezers towards the bead. When the knot is tight on the tweezers and snug up against the bead at the tips of the tweezers, release the pressure on the tweezers with your right hand and remove the tweezers from the knot.
Take one strand of the beading thread in each hand and pull sharply in opposite directions. This locks the knot in place next to the bead.
Straighten out your strand and slide another bead down towards the knot you just made. Snug it up against the knot.
Make another overhand knot loop and repeat the knotting process.
Note that although the description may seem complicated, with a little practise it will become almost automatic and knotting work will proceed quickly.
Attaching Clasps - Shows how to attach clasps to the ends of bead strands.
If your strand is not an endless loop of beads, then you will have to attach a clasp to the strand in order for it to be worn. The clasp will usually have 2 parts - a female part and a male part. With these types of clasps, the male part will be inserted into the female part and then it will lock into place. Other types of clasps do not have male or female parts - they are self contained and require a circular jump ring to be attached to the other end of the strand to hook into.
There are a number of different types of clasps:
Barrel - The male and female parts screw together and both parts will look similar.
Fish Hooks - The male part is hooked into the female part and it locks in place via spring action.
Lobster - Self contained clasp. Hooks onto opposite jump ring.
Spring Ring - Similar to lobster except it is round.
In order to attach a clasp to a strand of beads, the clasp will have to be separated into its 2 parts, and each part will have to attached to an end of the strand. There are essentially 2 ways that a clasp can be attached to a strand of beads:
Bead Tip Technique - The clasp parts can be attached to the beaded strand by connecting them to the attachment point of a bead tip or cup. The bead tip is already built into the bead strand. This technique is very useful for attaching clasps that do not have a jump ring attached, such as a barrel clasp. Using this technique allows the clasp to be attached after the bead strand has been completed.
Fish Hook Clasp Technique - The clasp parts can be attached to the bead strand by threading the 2 parts of the clasp into the bead strand itself - one part at each end. This requires that attaching the clasp be part of the process of stringing the beads or pearls themselves, and requires a little planning ahead of time. Below is an example of how such a technique is performed (for a single strand pf beads), using a fish hook clasp for illustration purposes.
Note that the "fish hook clasp" technique of attaching the clasp parts directly to the bead strand can only be done if the clasp parts have free-floating jump rings attached. If your clasp does not have jump rings, then you must use bead tips at each end of the strand and then bend the bead tip hook around the contact loop of the clasp. The reason for this is that without free-moving terminations, every day use of the necklace or bracelet will result in rubbing that will eventually wear out the termination and cause the strand to fall apart.
Notes:
Before starting any project, make sure you have all your tools and supplies ready.
Make sure you have several beading needles with leader thread loop prepared (the needle and loop pull the beading bead thread through the beads).
Separate and re-attach jump rings by pulling sideways only.
Lay out your bead design on a design or flock board.
Measure out your beading thread - 2x bead length plus 10 inches.
Attach beading needle and leader thread through beading thread and close the beading thread loop with an overhand knot. Make sure that the leader thread knot is in the middle of the leader thread loop.
Thread all beads. Move them towards the knotted end of the bead thread loop. No kinks or twists in the beading thread loop.

Use the beading needle to thread the male part of the fishhook clasp through the jumper ring. You do this with the male end because this part of the clasp has to be the strongest part, and the subsequent looping does not cut the beading thread.
Remove the beading needle by cutting the needle thread leader - at the leader thread knot. DO NOT CUT THE BEADING THREAD. Immediately re-knot the leader thread and put the needle away for later use.

Slip the loop of beading thread over the male clasp. Tighten loop over the male clasp all the way down to the jump ring.

Slide all the beads down the thread towards the male clasp. Snug them up against the end, making sure the thread loop has stayed tight against the jump ring.
HANG THE PIECE OVER NIGHT TO STRETCH BEADING THREAD.
Now finish the female clasp end - this technique is the same as that used in endless loop necklaces:
Cut away the overhand knot in the beading thread loop.
Separate the last 2 beads by a couple of inches. Pull one of threads back through the last bead so that the last bead now has only a single thread running through it.
Slip the single thread coming through the last bead through the leader thread of a beading needle.
Use the needle to run 2 loops of beading thread through the jump ring of the female part of the clasp. Remove the needle from the beading thread - WITHOUT CUTTING ANYTHING
Walk the female clasp down the thread towards the beads, leaving plenty of free beading thread at the end.
Attach the free end of the beading thread through the loop of a beading needle. Use the needle to run the beading thread back through the last bead.
The 2 threads now meet head-on back together and can be tied.
Pull on the reversed thread while holding the clasp. This draws the entire piece together.
Cut one thread shorter than the other - this provides a reference for making the finishing square knot. Tie x3 half-hitch knots while flipping the piece over between each knot - USE SHORT OVER LONG EACH TIME. You have now locked the female clasp.
Glue the knot with (a small drop) of jewellers cement. Flip over and do the other side. Let dry. Trim thread.
If the strand is too tight, manipulate a little to loosen.

Endless Loop Stringing - The endless loop is a continuous loop of beads without a terminating clasp.
This techniques is for making a strand of beads that does not have a clasp or other terminating hardware. The strand must be long enough to fit over one's head without binding, which means that it should only be used for making strands that are 26 inches or longer.
Lay out your design of beads - measure length.
Measure beading thread - x2 length of beads plus 10 inches.
Attach beading needle and leader thread through beading thread and close the beading thread loop with an overhand knot. Make sure that the leader thread knot is in the middle of the leader thread loop.
Thread all beads. Move them towards the knotted end - without twists or kinks.
Remove the needle by CUTTING THE BEADING THREAD AT THE END OF THE LOOP - PRESERVE THE BEADING NEEDLE THREAD LOOP.
Knot the end of the beading thread where you just cut (with and overhand knot) and hang the piece over night to stretch.
When you are ready to finish the piece, cut away both end knots.
Center beads on the beading thread and bring the ends of the strand near each other.
At one end of the strand pull the end bead away from the neighboring bead a couple of inches. Pull one of the threads back through the end bead so that that end bead has only a single thread running through it.
ON THE OTHER END OF THE STRAND FROM THE SIDE YOU JUST PULLED: Place one of the beading thread ends through the leader thread of a beading needle.
Use the needle to slip the beading thread through the bead with the single thread running through it. You will now have 2 sets of beads meeting head-to-head on opposite sides of a central separating bead.
Pull on the threads to bring the bead strand together snugly.
On the 2 sets of head-on threads, cut one thread shorter than the other. This provides a reference for making the finishing square knot. Tie x3 half-hitch knots while flipping the piece over between each knot - USE SHORT OVER LONG EACH TIME. You have now locked the knots.
Glue the knots with (a small drop) of jewellers cement. Flip over and do the other side. Let dry. Trim thread.
If the strand is too tight, manipulate a little to loosen.
Knotted Endless Loop Stringing - This technique combines both knotting between beads and an endless loop.
This technique is for stringing an endless loop using knots between each bead. Used mostly for pearl necklaces - the strand must be long enough to fit over one's head without binding, which means that it should only be used for making strands that are 26 inches or longer.
Measure out the length of beading thread needed - bead length x4 plus 10 inches.
Attach beading needle and leader thread. Terminate beading loop with an overhand knot.
Thread all the beads or pearls.
Remove the bead needle by cutting the beading thread at the end of the loop. DO NOT CUT THE NEEDLE LEADER THREAD.
Place an overhand knot at the free ends of the beading thread to complete the loop.
Hang the piece to stretch the bead thread overnight.
Slide a bead towards one end of the strand. Make a (tight and locked) overhand knot several inches from the end of the loop. This traps the end bead within several inches of double stranded bead thread - this bead that has several inches of thread to slide across is called a FLOATER.
Knot all the remaining beads EXCEPT THE LAST 2. Do not knot these last 2 beads because they will become double floaters.

Once all the beads have been knotted, and you have the terminal double floaters attached, remove the terminal knot near the end of the original single floater.
Bring the 2 ends of the strands near each other.
On the DOUBLE FLOATER SIDE OF THE STRAND, pull one of the threads back through the terminal bead leaving the terminal bead with a single thread running through it.
Using a beading needle, run one of the threads from the single floater side of the strand through the terminal bead on the double floater end. You will now have 2 sets of beads meeting head-to-head on opposite sides of a central separating bead. Pull on the threads to bring the bead strand together snugly.
On the 2 sets of head-on threads, cut one thread shorter than the other. This provides a reference for making the finishing square knot. Tie x3 half-hitch knots while flipping the piece over between each knot - USE SHORT OVER LONG EACH TIME. You have now locked the knots. Glue the knots with (a small drop) of jewellers cement. Flip over and do the other side. Let dry. Trim thread.
If the strand is too tight, manipulate a little to loosen.
Making Beaded Ear Rings
Earings made from beads can be made in several different ways:
Using head pins.
Making circular threaded bead strands.
Making vertical threaded bead strands.
Studs.
Using Headpins:
A head pin is a thin metal rod with a cap at the base. It resembles a sewing pin that has a blunt tip. They come is several lengths and widths, and are available in base metal, silver, gold filled, and 14K gold. The base metal variety tends to be thicker then the gold filled, silver or 14K gold types.
In order to use head pins, you will need a wire cutter and a fine-tipped round nosed jeweler's pliers.
Choose the type of head pin you will use.
Thread some beads onto the pin - some beads (especially pearls) may need to have their holes widened using a bead reamer.
Using the wire cutter, cut of excess head pin material leaving about 1/2 inch of pin.
Using tip of your round nosed pliers, bend the top head pin material perpendicular to the ear ring.
Using a thicker part of your round nosed pliers, grasp the head pin near the top bead and roll the head pin into a loop. You may have to finish the loop using the fine tip of the pliers.
Note: Making a well formed loop takes some practise, so start with the inexpensive base metal head pins and work on your technique.
Attach the newly formed loop to the jump ring or loop of an ear ring loop or post.
Ear Rings Using Threaded Beads - Circular and Vertical
You can make ear rings using the same stringing techniques described in this tutorials for necklaces - the endless loop, bead tips, and knotted loops or strands. Simply make your beaded strands and attach - either by jump ring or directly - to the connector hole found on all hoop type ear ring findings.
Studs A stud is an ear ring for pierced ears that (instead of a connector hole or jump ring) has either a cup or a small post for attaching a single bead or pearl, or a cabachon (a flat piece of gem stone or mineral). To use a stud, you must obtain half-drilled beads or pearls - these are beads whose whole is drilled only half way through the bead. Simply dab a little jewelers epoxy on the tip of the post and slide the half drilled bead or pearl onto the post and seat. The epoxy will lock the bead or pearl permanently into place.
For cups, simply glue a bead or pearl in place.
Making Beaded Pendants
Pendants are large accent beads (or other large ornaments) that hang from necklaces. They can be made of a single large bead (mineral, metal, ceramic etc), or they can be made up of an assembly of several smaller beads attached to each other.
There are several ways to attach pendants or pendant assemblies to a necklace. Regardless of the method you use, care must be taken to plan the pendant assembly properly ahead of time, taking into account several factors:
Length - Pendant accent pieces tend to be large and take up significant space on the wearer's chest. Therefore, when planning a pendant necklace, factoring in the size of the pendant accent piece or assembly must be done. For example, supposing the client wishes a medium length pendant necklace that will hang to the sternum area. The length of a standard bead strand to meet this sizing requirement might normally be 26 inches. However, if the pendant or pendant assembly will be 3 inches vertically, then the length of the regular necklace might have to be shortened to approximately 20 or 22 inches.
Thread Length - Unlike making a normal bead strand, making a pendant piece requires interrupting the bead strand in the middle for the purpose of attaching the pendant bead or assembly. This means that half the beads must be strung prior to stringing the pendant, and then the remaining beads are strung. Care must be taken to ensure that there is sufficient thread on both sides of the pendant to string all the beads and the clasp (if any). This is especially important if the beads are going to be knotted.
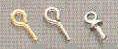
Bead Sizing - As the bead strand approaches the pendant bead or assembly (from both sides), it is usually better to have a few beads of decreasing size on each size of the pendant. This provides a visual offset for the pendant, and also helps the pendant to hang properly. French Wire - The purpose of French Wire is to protect beading thread from the abrasive effect of metallic loops or jump rings, which might otherwise eventually cut through the beading thread and destroy a bead strand. To use, string the beads leading up to the pendant. Then, using your beading needle, the beading thread is drawn through a short length (maybe ¼ to ½ inch) of French Wire, and the loop or jump ring of the pendant is positioned over the French Wire. The the remaining beads are then strung and the strand finished normally. The loop of the pendant will hang from the (French Wire) protected part of the strand. There are several methods of attaching or including pendants to beaded strands: Loop Screws - If the top of the pendant has a vertical hole drilled into it, then a loop can be attached to the pendant by screwing in and epoxying a screw eye into the hole. A screw eye is a finding that consists of a small screw with a loop attached at the head. Screw eye findings come in all shapes, metals and sizes. Remember - a screw eye is only used for pendants with a small hole drilled vertically into the top of the pendant.
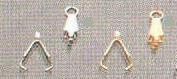
Bales - If the pendant has a hole drilled through the side, and if the hole is drilled near the edge of the pendant, then it is possible to attach a bale finding to the pendant and so attach a loop. Bales are small metallic clamp-like findings with a loop at one end and a short post at the other. The bale is spread apart, the post is inserted into the hole in the pendant, and the bale is then squeezed closed, locking the pendant to the bale. The necklace is then completed normally using the loop that is part of the bale.
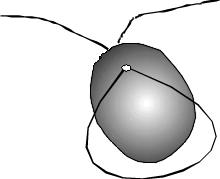
Looping Thread - Pendants with holes drilled through from the side can be attached by looping beading thread through the hole and then around the body of the bead. This method of attachment is similar to the looping method illustrated in the Fish Hook Clasp attachment tutorial. Essentially, you use your beading needle to run the beading thread back to front through the hole in the pendant. Once through, use your finger to press a loop of beading thread onto the front of the bead. Then thread the needle back through the hole towards the back of the bead (be careful not to split the thread). Once through, lengthen the loop of thread at the front of the pendant and loop the thread around the body of the pendant. Snug the thread.
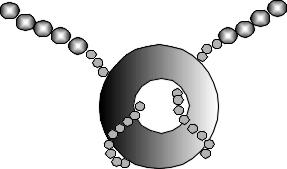
One variation on this method is used with donut beads - round circular beads with a very large circular opening in the middle. At the middle of the regular strand of beads, string several inches of very small metallic beads and then continue on to finish the regular bead strand. Once the strand of beads is finished, return to the middle of the bead strand and push the center of the part made up of the small metallic beads through the large central hole in the donut bead. Then loop this part around the body of the donut bead and snug.
Beaded Pendant Assemblies - Pendant assemblies are groups of beads threaded or chained togther into a pendant unit that is then attached to a necklace strand. There are many ways of making such assemblies, but one method is to use the "Threaded Back" method:
Using a needle and thread assembly, thread half the beads required for the normal bead strand. After threading these beads, add a few beads of decreasing sizes (perhaps ending with a metallic spacer bead).
Thread all the pendant beads in the vertical order in which they will hang.
Thread a "turn around bead", usually a very small metallic bead.
Use the needle to thread back through the (already threaded) pendant beads. DO NOT THREAD BACK THROUGH THE "TURN AROUND BEAD".
NOTE: Because the pendant beads will be assembled using double threads, the holes in the beads must be wide enough to handle this thickness. Test the width of the holes in the pendant beads prior to starting the project.
Once the pendant beads have been reverse threaded, start stringing the remaining beads of the necklace in the reverse order of the first half. Finish normally.
