
How To Draw Doll Faces
How To Draw Doll Faces
Designing doll faces to personalise your doll and make her a "one of a kind" heirloom.
It's a wonderful feeling when you finally finish sewing your doll. She is SO cute, her frock is just adorable and her hair is exactly the way you wanted it. She is just perfect! The only thing left to do is to draw her face.
This is the part of doll making that can cause the most anxiety amongst doll makers, but by following a few simple "rules" you can confidently achieve a gorgeous face every time.
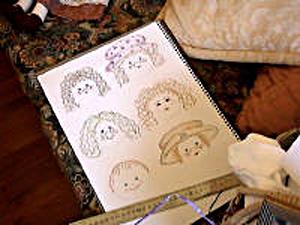
Always begin by drawing your doll's face on paper. Practice positioning your doll's features to ensure you have the right proportion and position.
Have fun experimenting with different styles and observe those around you. Babies, small children and characters in children's books often have cute features which can provide inspiration.
* On a sheet of paper draw a shape similar in size to your doll's head.
* Lightly draw a line horizontally and vertically through the centre of the "face". See figure 1. You may like to photocopy this and use it as a template.
Figure 1
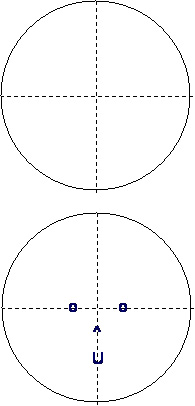
Figure 2
* Look in the mirror and you'll notice your eyes are approximately midway between your chin and the top of your head. Mark the centres of the eyes on the horizontal line an equal distance from the midline. By placing the eyes slightly lower on the face your doll will have a younger appearance. See figure 2.
* Divide the lower half of your face into thirds and mark a small dot on the centre line at these points. These will be the positions of the nose and the mouth.
* Next you will need to choose the style of face you would like. The style you choose should fit the character of your doll. A naive style doll will have a much simpler face than a more formal doll.
* Experiment with different shapes for each facial feature. You may like to try round eyes and oval eyes, with or without eyelashes and eyebrows, a little button or a straight nose and different sizes and shapes of hearts or smiley u shapes for your dolls mouth. Some dolls look gorgeous with two tiny "commas" for nostrils instead of a nose. The more styles you try out the easier it will be for you to choose a face to really complement your doll.
* When you are happy with the style, size, shapes and positioning of all of your doll's facial features it's time to add some colour to bring your doll to life.
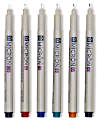
Pigma micron pens
* Pigma micron 01 made by Sakura are the brand of pen I prefer. They are waterproof and fade proof and they contain archival, pigment ink. They are also available in a range of 6 colours. Derwent artist pencils also provide a high quality finish to your doll's face and they can be purchased individually in your favourite colours. If you plan to continue doll making then purchasing good quality pens and pencils to finish your doll is an excellent investment.
* Choose eye, mouth and cheek colours to complement your doll. Use the black pen to draw the eyes and eyelashes, the brown pen to draw the nose and eyebrows and either the brown or the red pen for your doll's mouth. Be careful when using drawing pens, they have a very fine tip so always hold them in an upright position (not slanted) to prevent damaging the pen tip.

* Before adding pencil colour Add colour to your faceto your doll experiment with the various ways you can apply this. Many different effects can be achieved by using either a sharper or blunter pencil. You should also try the side of the side of the pencil as well as the point. A good way to add shading is to apply the colour to a scrap of paper or calico and carefully rub this over the area you want to colour. Gradually build up the colour in layers until you obtain the desired look. Just remember it's easier to add a bit more colour than it is to try to remove it. It's also a good idea to keep a record of the colours you have used, just jot down the names of the colours and any special techniques you may have used to apply them alongside your diagram as a reference for future use.
* Once you are completely satisfied with your doll's new face it is time to transfer it onto fabric. But before you take the final step it's a good idea to practice one more time just to make yourself comfortable with working on fabric. The slightly uneven texture of the calico will make a difference when you are drawing the face and the colours may need adjusting to suit.
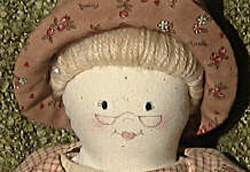
* Place a piece of calicoTransfer the face onto fabric in an embroidery hoop and follow the steps listed above, once again. Once you have added all of your doll's features to the calico and you are satisfied she has just the attitude and expression you are trying to achieve then you're ready to complete your doll!
You should feel completely comfortable now applying your doll's face!
It's a wonderful feeling when you finally finish sewing your doll. She is SO cute, her frock is just adorable and her hair is exactly the way you wanted it. She is just perfect! The only thing left to do is to draw her face.
This is the part of doll making that can cause the most anxiety amongst doll makers, but by following a few simple "rules" you can confidently achieve a gorgeous face every time.
Always begin by drawing your doll's face on paper. Practice positioning your doll's features to ensure you have the right proportion and position.
Have fun experimenting with different styles and observe those around you. Babies, small children and characters in children's books often have cute features which can provide inspiration.
* On a sheet of paper draw a shape similar in size to your doll's head.
* Lightly draw a line horizontally and vertically through the centre of the "face". See figure 1. You may like to photocopy this and use it as a template.
Figure 1
Figure 2
* Look in the mirror and you'll notice your eyes are approximately midway between your chin and the top of your head. Mark the centres of the eyes on the horizontal line an equal distance from the midline. By placing the eyes slightly lower on the face your doll will have a younger appearance. See figure 2.
* Divide the lower half of your face into thirds and mark a small dot on the centre line at these points. These will be the positions of the nose and the mouth.
* Next you will need to choose the style of face you would like. The style you choose should fit the character of your doll. A naive style doll will have a much simpler face than a more formal doll.
* Experiment with different shapes for each facial feature. You may like to try round eyes and oval eyes, with or without eyelashes and eyebrows, a little button or a straight nose and different sizes and shapes of hearts or smiley u shapes for your dolls mouth. Some dolls look gorgeous with two tiny "commas" for nostrils instead of a nose. The more styles you try out the easier it will be for you to choose a face to really complement your doll.
* When you are happy with the style, size, shapes and positioning of all of your doll's facial features it's time to add some colour to bring your doll to life.
Pigma micron pens
* Pigma micron 01 made by Sakura are the brand of pen I prefer. They are waterproof and fade proof and they contain archival, pigment ink. They are also available in a range of 6 colours. Derwent artist pencils also provide a high quality finish to your doll's face and they can be purchased individually in your favourite colours. If you plan to continue doll making then purchasing good quality pens and pencils to finish your doll is an excellent investment.
* Choose eye, mouth and cheek colours to complement your doll. Use the black pen to draw the eyes and eyelashes, the brown pen to draw the nose and eyebrows and either the brown or the red pen for your doll's mouth. Be careful when using drawing pens, they have a very fine tip so always hold them in an upright position (not slanted) to prevent damaging the pen tip.
* Before adding pencil colour Add colour to your faceto your doll experiment with the various ways you can apply this. Many different effects can be achieved by using either a sharper or blunter pencil. You should also try the side of the side of the pencil as well as the point. A good way to add shading is to apply the colour to a scrap of paper or calico and carefully rub this over the area you want to colour. Gradually build up the colour in layers until you obtain the desired look. Just remember it's easier to add a bit more colour than it is to try to remove it. It's also a good idea to keep a record of the colours you have used, just jot down the names of the colours and any special techniques you may have used to apply them alongside your diagram as a reference for future use.
* Once you are completely satisfied with your doll's new face it is time to transfer it onto fabric. But before you take the final step it's a good idea to practice one more time just to make yourself comfortable with working on fabric. The slightly uneven texture of the calico will make a difference when you are drawing the face and the colours may need adjusting to suit.
* Place a piece of calicoTransfer the face onto fabric in an embroidery hoop and follow the steps listed above, once again. Once you have added all of your doll's features to the calico and you are satisfied she has just the attitude and expression you are trying to achieve then you're ready to complete your doll!
You should feel completely comfortable now applying your doll's face!
