Basic T-Tunic Sewing Pattern

Basic T-Tunic
by Duchess Leah Kasmira of Natterhelm
Now that you have a nice, comfy pair of period trousers, maybe you'd like something to cover your upper extremities as well? I suggest the versatile, universal, and down-right comfortable T-tunic.
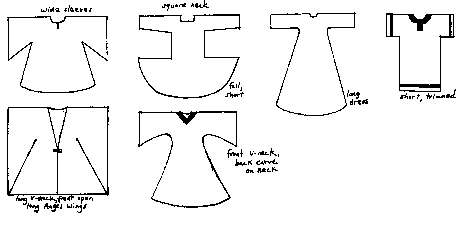
The T-tunic is so called because of its resemblance to that letter when opened and laid flat, and has been worn by just about every culture at some time or another. It's good for a starter costume, as it may be converted easily into a garment fitting the era you finally do choose to portray. The pattern can be adapted to be short, long or anywhere in between, as full/narrow as you desire, with long, short, medium, full, narrow, or even no sleeves, with open or closed sides, as you wish.
Try your first one out of an old cotton (highly prized fabric in the Middle Ages) or muslin bedsheet -- it is already broken in,it's expendable, and it will drape well.
To construct:
- Find and write down these measurements:
- Neck to desired length + at least 2"
- Neck to crown of bust (2" - 3" below center of armpit where bust is fullest)
- Bust or chest at fullest +3" for ease of movement
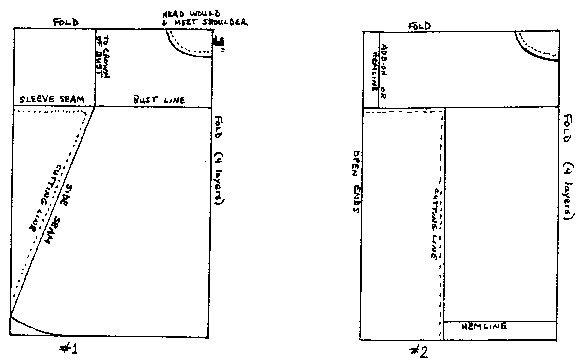
- Fold your fabric in half width-wise. Fold it again length-wise (4 layers).
- Find the length from the neck to the crown of the bust and mark on the fabric with tailer's chalk all the way across.
- Find the chest measurement and divide by four. Mark this point on the line you have just drawn with the chalk, measuring from the center fold out.
- Find the point from the neck to the desired length of the garment and mark it. Now note the length from the line you drew in #3 to the line you just drew. Draw a diagonal line, according to your own desired fullness,issuing from the armpit and ending at the edge of the fabric. Mark the distance from the bust line to the hem on this line, and round off the bottom edge as in illustration #1 or straight down as in illustration #2.
- Parallel the lines you have just drawn (which are your seam lines) 1/2" out -- these will be your cutting lines.
- Draw a line issuing from the bustline-armpit intersection across the fabric at 90 degrees or at an angle which will provide you the desired fullness in your sleeves. Parallel this line as well with cutting line 1/2" out.
- Mark the point along the center fold which is 3" from the top. Find the point on your shoulder where your head, if not for your neck, would meet your shoulders, and mark this point on your fabric. Connect these two pints with an arced line. This is your seam line. Parallel this seam line 1/2" closer to the edge of the fabric, as before, for a cutting line. This will give a neck hold which is a little wide, but which should slip right over your head.
- Cut out pattern, cutting along all cutting lines, open the fabric -- you now have only two layers -- and stitch along side seam and sleeve-seam lines.
- Turn neck, face edges, hem and wear. For longer sleeves, simply and fabric to sleeve edges before sewing side seams.
HINT: Turn raw edges of neck, cuffs and hem to the outside. Press down and cover over with ribbon or trim. This is a very period practice and it secures the edges, increasing the life-span of your new garment while adding a measure of grace at the same time.


