
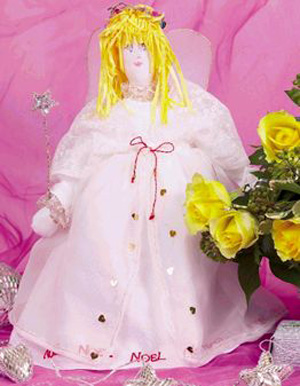
Tree Top Doll Ornament
Tree Top Doll Ornament
Materials:
White cotton fabric, 25cm (10")
Soft filling
Cotton lawn, 25cm (10")
Lace, 50cm x 2cm (20" x 1")
Netting, 25cm (10")
Cream lace, 40cm x 12cm (15-3/4" x 4-3/4")
Sheer silk fabric, 25cm (10")
White tights
Two 36cm (14") lengths of craft or Christmas decoration wire
Square of knitted fabric, 18cm (7")
Embroidery silks
Sequins
Beads
Glitter spray
The red and gold thread (7046) used is Anchor pearl metallic thread.
Pattern (PDF) needs to be enlarged 230%
Pattern (image already enlarged) Print this in a program like MS Paint and uncheck 'Fit to page' in the print options and it will print on 4 normal sized pages that you can then tape together.
Step by step
Enlarge templates on a photocopier and transfer onto tracing paper. Be sure to obey all cutting instructions and ensure grain lines are correct before placing onto material. Use sharp scissors to cut out the fabric pieces.
Cut out pieces A, B and C in the white cotton fabric. For the head, arms and legs, place two sides of fabric together and with a 0.5cm (ÂĽ") seam, stitch around the edge of each part leaving an opening for filling as marked.
Turn through and fill softly. Push the legs slightly up into the body with the leg seams to the front so the feet are pointing forward. Turn under the raw edge of the bottom of the body, then pin to secure the legs before sewing into position. Close the opening on the arms before attaching them to the shoulders.
Use pattern piece D to cut the front and back bodice, fold over this piece of fabric and join the underarm and side seams. For the skirt of the dress, cut two rectangles 36cm x 25cm (14" x 10"). Place the two sides together and stitch side seams along the shortest edge. To gather the skirt use a small running stitch around the top. Pull up the stitches to fit the bodice. With the bodice and skirt right sides facing spread the gathers evenly. Pin into place beforehand, then sew or machine to finish.
The neck and sleeves are finished with a narrow turning and gathered lace. Embroider around the bottom of the skirt with a row of white chain stitch then with the word "Noel".
Cut one rectangle measuring 75cm x 24cm (29½" x 9½) in sheer silk. Neaten with a double narrow hem around three sides, leaving one long edge for the waist of the dress. Turn down 1.5cm (½") folding in the raw edge.
Stitch along to the end to make a tube around the top of this skirt. Feed 50cm (20") of red embroidery thread through the casing to pull up and form gathers.
To make the shoulder pieces of the lacy overdress cut two of piece E, then as diagram shows, add a few gathers in the lace. Stitch the ends to the front and back of the silk skirt, making sure you leave the arm holes completely open.
Decorate with sequins, gold thread and beads. This doesn't have to be in any order, but ensure that all decoration is evenly distributed.
Make the underskirt by gathering a piece of net 75cm x 24cm (29½" x 9½) along one long edge, pulled up to fit the waist of the doll and tied into place.
Her face is sewn using satin stitch for the eyes and mouth, two small French knots for the nose and straight stitch for the eyebrows and lashes.
It is important to dress the doll before you add the wings and hair, otherwise you may find you can't fit the dress back on! Cut and fold the hair, F as diagram. Secure to the head with a few stitches and trim as necessary.
The wings will require a little trial and error to get them into the right shape. Once you have bent the wire into two wing-like forms, stretch and twist tights over the wire then tie to fasten with thread at the edge of the wings.
Cut tights close to fastening, then join the wings together. (Look at the diagram for the wings for further guidance.) Spray with glitter and secure the wings to the centre of the doll's back with a few stitches.
To make the wand, thread beads onto a 16cm (6") length of wire, fold in half and twist together. Finish with a sequin star, stitched on top.
Thread beads onto wire to form a circle. Decorate with sequins and stitch into position at the back of the head. Finish off with a final dusting of glitter spray to give your fairy extra sparkle.
