
Santa Basket Ornament
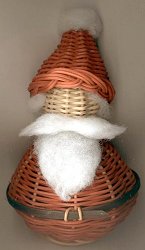
Santa Basket Ornament
Finished size : appx. 5 1/2" h
Materials :
#1 or #2 RR Natural and Red
Narrow black flat for belt---12"
Head #1 or #2 RR natural...4@ 14", 2 or 3 long pieces 36"-48"
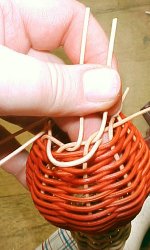
Holding the 4@14", cross 2 over 2, Now lay one end of a long piece next to the top 2 so that 7" of it becomes another spoke and the rest will be the weaver.
Weave under 2, over 3, under 2, over 2 for about 3 rows, then weave singles, (You will have an uneven number of spokes so you can do continuous weaving) spread the spokes slightly to form the top of the head, back into the neck and then back out again about 2 or 3 rows to start the body (shoulders).
Weaver is shown in another color for clarity purposes only.
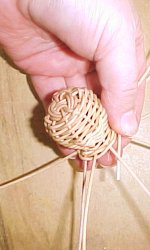
Head and shoulders
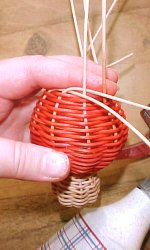
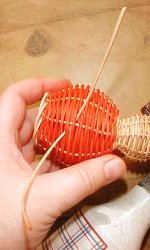
Body
Switch to a red weaver and weave the body, same way as you did the head....when hole at bottom is a bit bigger than a quarter, end the weaver.
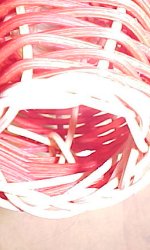
Border
Making the border.
Row 1 of border
Behind one and out
Row 2of border
under two and in.
Belt and Buckle
see below for making the Buckle, then ...feed the black "belt" through the buckle and glue overlap if desired.
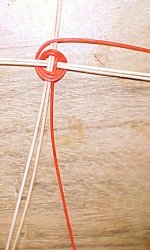
Inserting the "buckle"
Insert a piece of RR
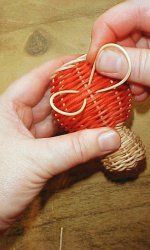
Making the buckle
Insert the ends back in
Tuck the ends under the diagonal inside the Santa and pull everything snug.
Hat is worked the same way as the head except form a cone instead of a ball. Let the spokes flare out only far enough to fit the head...When the cone is as long as you want it and fits the head, insert another spoke beside each spoke in the hat so you can work the border with two spokes...The border is worked the same as the one under the body, except the first round is flared so it shows from the outside.
Glue some fuzz to inside of hat for hair and glue hat on head….glue on Santa's beard and the pompom on hat.
Materials :
#1 or #2 RR Natural and Red
Narrow black flat for belt---12"
Head #1 or #2 RR natural...4@ 14", 2 or 3 long pieces 36"-48"
Holding the 4@14", cross 2 over 2, Now lay one end of a long piece next to the top 2 so that 7" of it becomes another spoke and the rest will be the weaver.
Weave under 2, over 3, under 2, over 2 for about 3 rows, then weave singles, (You will have an uneven number of spokes so you can do continuous weaving) spread the spokes slightly to form the top of the head, back into the neck and then back out again about 2 or 3 rows to start the body (shoulders).
Weaver is shown in another color for clarity purposes only.
Head and shoulders
Body
Switch to a red weaver and weave the body, same way as you did the head....when hole at bottom is a bit bigger than a quarter, end the weaver.
Border
Making the border.
Row 1 of border
Behind one and out
Row 2of border
under two and in.
Belt and Buckle
see below for making the Buckle, then ...feed the black "belt" through the buckle and glue overlap if desired.
Inserting the "buckle"
Insert a piece of RR
Making the buckle
Insert the ends back in
Tuck the ends under the diagonal inside the Santa and pull everything snug.
Hat is worked the same way as the head except form a cone instead of a ball. Let the spokes flare out only far enough to fit the head...When the cone is as long as you want it and fits the head, insert another spoke beside each spoke in the hat so you can work the border with two spokes...The border is worked the same as the one under the body, except the first round is flared so it shows from the outside.
Glue some fuzz to inside of hat for hair and glue hat on head….glue on Santa's beard and the pompom on hat.
