
German Paper Stars
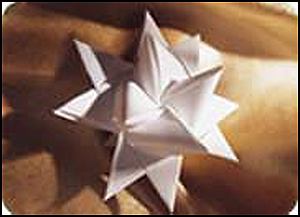
German Paper Stars
Materials:
four strips 3/4" wide paper 24" long
scissors
The paper strips can be obtained from a variety of sources or you can cut them yourself. Rogene obtained precut strips from her local printer who cut 11-inch x 17-inch copy paper into 5/8-inch wide strips. You might also try using gift wrapping ribbon. Though it is a bit slippery and is more expensive than the others it is an easy way to obtain strips of many colors. Also satisfactory is florist ribbon, which costs about 10 cents a yard. If you prefer to make smaller stars cut the strips narrower and shorter. For larger stars, wider and longer strips will be needed. To make threading easier, cut the ends of all of the strips at an angle.
Steps:
Fold each strip in half crosswise and crease firmly along the fold. Interlock the folded strips into a basket weave (figure 1). Pull the ends so the pieces fit snugly together.
Pick up the top layer of the strip at the upper left and fold it forward. Crease well (figure 2). Repeat with the three remaining strips (top layers only) moving counterclockwise. When folding the fourth strip, insert it into the slot formed by the fold of the first strip (figure 3). Pull tight.
To make the points start at the top right. Fold the strip back and down forming a right angle and making a diagonal crease at the left (figure 4). Fold the strip forward and down making a second diagonal crease (figure 5). Fold forward along the center of the triangle folding in half vertically (figure 6).
Pick up the end of this strip and insert it through the loop immediately UNDER it (figure 7). It will be easier to accomplish this if you fold the point back slightly. Pull the strip tight. It will look like figure 6 again except that now the strip will be locked in place. Fold this strip back up covering the point and crease along the fold. Turn work a quarter turn to the left and repeat with the top strip on the right. Continue around in this manner until all four strips have been worked.
Turn work over and repeat step 4 with the four longer strips. If you chose to make flat stars you will stop at this point, pull each strip one at a time as tight as possible and cut off the extending tail. To make the standing points, continue with steps 6 through 8.
Take the loose strip at the top right, lift and turn under (away from you) then around and over in a counterclockwise direction to make a complete loop. Insert end of strip through the slot just beneath the strip on the left (figure 8). Pull on the end of the strip to bring the point into position. Repeat with the three remaining strips on this side of the star, then turn star over and repeat with the four strips on the other side.
Pull all the ends one at a time as tightly as possible and cut. The cut edge will retract into the point.
Add a metallic or nylon thread for hanging.
